


Wednesday, February 15, 2012
This one is important to me. With the big anti bullying movement taking place, I thought this would send a good positive message to everyone. Be yourself it is okay. You don't have to be like everyone else.
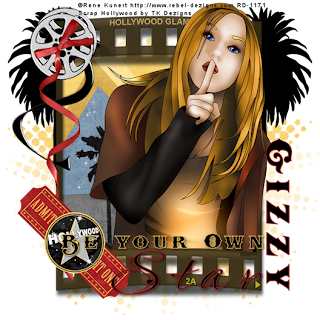
Be Your Own Star
This tutorial was written
by Sarah Fiack on
February 15,2012
Any resemblance to another
tutorial is purely coincidental.
For this tutorial, I’m using a
tube by Rene Kunert
The tube is now FTU &
available here.
Supplies:
Tube of choice
Scrap of choice.
I’m using one by TK Dezigns
Called Hollywood
It is available at Pimp My Tags
with Scraps
Here
Mask:
Kristin TD Mask8 Blog
Open a 600x600 new image.
Open up your tube closeup & scrap supplies.
Open a frame of choice &
paste as a new layer.
Click inside the frame with your
magic wand tool.
Selections modify expand by 3.
Paste a paper of choice as a
new layer.
Selections invert & press delete.
Move the paper layer under the
frame layer.
Paste your tube closeup between the
two layers.
Duplicate the closeup layer once.
Move the copy layer to the top in
your layer palette.
On the original closeup layer, press delete.
Select none.
Now back on the copy layer,
lower the opacity of the layer.
Erase the parts showing past the bottom of
the frame.
This helps give the layer an illusion of coming
out of the frame.
Return the opacity to 100.
Add a drop shadow to original closeup layer.
2,2,50,5 black.
Open a tree element.
Paste on the bottom layer on one side
of the frame. You want the top of the tree
visible. Duplicate once & mirror.
You want to have a tree on each side of
the tag.
Open a film reel element. Resize 70%
Rotate free rotate right 90 or as needed.
Position on the tag on a top corner of the frame.
Open a ribbon element of choice.
Resize 70%
Rotate Free rotate left 90.
Paste on the tag on top of the film reel layer.
Open tickets elements.
Resize 50%
Rotate free rotate right 45.
Paste along a corner of the frame.
Open a record/cd element.
Resize 25%
Paste on the tickets element.
On the bottom layer of the tag,
Paste a paper of choice as a new layer.
Apply the mask KristinTD Mask8.
Merge group.
Merge layers together.
Add wordart or your own saying.
I did a saying of my own.
Add a drop shadow to the text.
Resize everything 88%.
Add copyright info & name.
Save as png.
Thanks so much for trying my tutorial.
Subscribe to:
Post Comments
(Atom)
Zone Award

0 comments:
Post a Comment