






Showing posts with label Forum Style. Show all posts
Showing posts with label Forum Style. Show all posts
Sunday, July 1, 2018
CT forum set featuring the stunning art of
Enys Guerrero using her March 2018 Bonus.
I am also showcasing the fantastic Inspired
by Enys Guerrero March 2018
Scrap by Chaos Priestess. To be forgotten
by those we held dear hurts the deepest.
It is a pain that will cut through every layer
of our soul. Always remember to tell those
that matter, that you care about them.


Saturday, May 7, 2016

This tutorial was written
by Wicked Cupcake on
May 7,2016
Any resemblance to another
tutorial is purely coincidental.
I am using a tube by Keith Garvey.
Programs/Plugins
Paint Shop Pro X2
Mura's Meister: Copies
Xero: Illustrator
Greg's Factory Output: RGB Isolate
Open a 700x250 new image.
Open a tube closeup of choice.
Copy & paste the close up as a new layer
onto your blank image.
Resize your tube if needed. I resized
mine by 83%. Position on either side of
your image where the tube looks best.
I positioned mine on the left side.
Duplicate the closeup twice. Hide
the copy layers for now & select
the original layer.
Apply the plugin Mura's Meister: Copies.
Use the setting Wall Paper(rotate) with
default settings.
Go to Adjust: Blur - Gauassian Blur 8.00.
Now apply the plugin dsb flux.
I did the Direction Right and Percentage 25.
If your tube is on the right side you may
want to switch it to Left Direction.
Unhide the first tube copy layer &
make sure it is selected on your layer palette.
Apply the plugin Xero: Illustrator with the settings:
Abstraction: 32
Colouration: 105
Definition: 77
Change the blend mode on this layer to Hard Light.
Select your magic wand tool. Click on side
of the layer that is opposite the current closeup
layer we are working on. Press delete. This should eliminate
the extra slightly white part of the layer.
Now unhide the top closeup layer & make sure it is
selected on your layer palette.
Apply the plugin Greg's Factory Output: RGB Isolate
with Default settings.
Select your Selection tool. Choose a shape for your
selection. I set mine to circle. Also make sure the Mode
is set to Add ( Shift ).
I drew out three small circle shapes. After drawing the first
one out, i held the shift button to keep it selected & draw out
the second circle selection. Once selected, press delete on
your keyboard & select none.
Add a new raster layer. Make sure it is the top layer
on your tag. Fill with a color from your tag. Select the
layer with your magic wand tool. Selections Modify -
Contract by 4.00. Press delete on your keyboard. Select
none. Adjust - Add noise - Uniform & 12.00
Add artist copyright & name to the tag. Save your tag as a png.
Thanks for trying my tutorial.
Thursday, February 19, 2015

This tutorial was written
by Wicked Cupcake on
February 19,2015
Any resemblance to another
tutorial is purely coincidental.
I am using a tube by Anna Marine
This tube is available at
CDO
by Wicked Cupcake on
February 19,2015
Any resemblance to another
tutorial is purely coincidental.
I am using a tube by Anna Marine
This tube is available at
CDO
Plugins
Mura's Meister Copies
VM Natural Splash
VM Distortion Flipper
Xero Porcelain
Open a 600x250 new image.
Open a tube of choice.
Fill the new image with a white background.
Copy and paste your tube as a new layer
onto your new image. Apply the plugin
Mura's Meister Copies Wallpaper rotate default.
Duplicate this layer once.
Still on the original wallpaper layer,
apply the plugin VM Natural Splash
default setting.
Now select the wallpaper copy layer.
Apply the plugin VM Distortion Flipper
default settings.You should have two rows
of 5 squares each going across horizontally.
Select your selection tool. Select arond a
square on either side. I chose the left square
on top first. Holding shift down, select a square
diagonal from the one you just selected. I chose
the 2nd square on the bottom row.Continue to alternate
the rows until you have 5 squares total selected.
Right click on the layer in the layer palette.
Promote selection to layer. Select none.
Delete the wallpaper copy layer.
Select the promoted selection layer.
Apply the plugin Xero Porcelain default setting.
Add a drop shadow twice to this layer.
Settings: 2,2,5,5.00 color black
Copy and paste your main tube as a new layer
on top of the previous layers. Apply the drop shadow
twice to this layer.
Merge layers. Add a new raster layer. Fill with
a color of choice from your tag. Select this layer with
your magic wand tool. Selections modify
contract by 3. Press delete button on keyboard.
Select none. This should give you a border around
your tag. You can add a drop shadow to the layer
if you wish.
Add artist copyright information & name.
Save as png. Thanks for trying my tutorial.
Mura's Meister Copies
VM Natural Splash
VM Distortion Flipper
Xero Porcelain
Open a 600x250 new image.
Open a tube of choice.
Fill the new image with a white background.
Copy and paste your tube as a new layer
onto your new image. Apply the plugin
Mura's Meister Copies Wallpaper rotate default.
Duplicate this layer once.
Still on the original wallpaper layer,
apply the plugin VM Natural Splash
default setting.
Now select the wallpaper copy layer.
Apply the plugin VM Distortion Flipper
default settings.You should have two rows
of 5 squares each going across horizontally.
Select your selection tool. Select arond a
square on either side. I chose the left square
on top first. Holding shift down, select a square
diagonal from the one you just selected. I chose
the 2nd square on the bottom row.Continue to alternate
the rows until you have 5 squares total selected.
Right click on the layer in the layer palette.
Promote selection to layer. Select none.
Delete the wallpaper copy layer.
Select the promoted selection layer.
Apply the plugin Xero Porcelain default setting.
Add a drop shadow twice to this layer.
Settings: 2,2,5,5.00 color black
Copy and paste your main tube as a new layer
on top of the previous layers. Apply the drop shadow
twice to this layer.
Merge layers. Add a new raster layer. Fill with
a color of choice from your tag. Select this layer with
your magic wand tool. Selections modify
contract by 3. Press delete button on keyboard.
Select none. This should give you a border around
your tag. You can add a drop shadow to the layer
if you wish.
Add artist copyright information & name.
Save as png. Thanks for trying my tutorial.
Tuesday, March 18, 2014
Necklace

This tutorial was written
by Sarah Fiack on
March 18,2014
Any resemblance to another
tutorial is purely coincidental.
For this tutorial, I’m using
a tube by Enamorte
You can purchase her tubes at
CDO
No outside supplies are needed.
Plugins: Xero Porcelain
Mura's Meister Copies
dsb flux - blast
Open a 600x250 new image.
Open up your tube of choice as well.
On your materials palette,
for the foreground color,
select a color from your tube.
Hide the background color for now.
Select your ellipse preset shape
tool. Make sure its select to
ellipse and width set to 10.00.
Draw out a shape on your new image.
Position in center of the tag.
Convert to raster.
Adjust - add noise - uniform 45.
Back on your materials palette,
select a dark color for the foreground
& a lighter color for background.
On the foreground, choose gradient -
choose the Foreground -background
gradient.
Angle 90 Repeat 0.
Click inside your preset shape with
your magic wand tool. Selections
modify expand by 3.
Add new raster layer. Fill this layer with the
gradient you made.
Move this layer under the shape layer.
Paste a tube closeup as a new layer
between the two above layers.
Selections invert & press delete.
Select none.
Select your regular tube & copy it.
Paste as a new layer above your bottom
background layer.
Apply the plugin Mura's Meister Copies:
Wallpaper rotate.
Click the bottom layer again.
Selections - select all.
Image - copy to selection.
Duplicate the wallpaper layer.
Select the copy wallpaper layer.
Adjust -blur- motion blur
Angle 90.00 Strength 100
Effect - plugin dsb flux -blast
Direction left Percentage 40%
Effects - edge effects - enhance once.
On the same layer, select your selection tool.
Select a vertical
rectangle anywhere of choice
on the layer. Make sure it goes from
top to bottom. Press delete.
Select none.Repeat across the tag.
I did this a total of 7 times but it
may vary on your tag & rectangles.
Drop shadow the same layer.
2,2,50,5 black.
Go back to the original wallpaper layer.
Adjust blur - gauassian blur 3.00
on the layer.
Apply the plugin Xero Porcelain
default settings.
Merge layers visible.
Apply the plugin AAA Frames Foto
Frames. Default settings but change
width to 5.
Add artist copyright information & name
to the tag. Save as png.
Thanks for trying my tutorial.
Tuesday, January 28, 2014

This tutorial was written
by Sarah Fiack on
January 28,2014
Any resemblance to another
tutorial is purely coincidental.
For this tutorial, I’m using a tube
by Robin McQuay. You can find this tube
for purchase at Digital Chaos
Plugins:
Mura's Meister Copies
DSB Flux - Blast
Xero Porcelain
Open a 600x250 new image.
Open up your color image.
I am using one that is nearly
all purple. You can choose
one of choice.
Select your new image
with your magic wand tool.
Copy and paste a
layer of your image.
Position on the tag to
a side.I moved mine to
the left side.
Selections invert & press
delete button on keyboard.
Select none.
Take your selection tool.
Draw around the face
of your image layer.
Selections -modify
expand by 2.Invert.
Press delete.
Select none.
Select a section from your
original image with your
selection tool.
Copy - paste as a new
image.
Go to your Materials palette.
Select the new image in your
pattern box for both matieral
boxes.
Select the ellipse preset
shape tool Make sure it is
set to circle. Width 0.00
Make sure you are selected
on the bottom layer of the tag.
Draw out a smaller circle.
Convert to raster.
Apply the plugin Mura's Meister
Copies -Wallpaper rotate
(default). Apply the wallpaper
plugin twice if you need too.
On the same layer, Effects
Art Media Effects - Brush strokes.
Default - change color to white.
Duplicate the tube image layer.
On the original layer, apply the
plugin DSB Flux - Blast.
Direction right Percentage 64
On the duplicated tube
image layer, apply
a drop shadow.
Effects -3D effects- drop shadow
2,2,25,5 Black.
Select your paint brush tool.
Select the paing dot size
Round 05.
Make sure your Stroke box
on the materials palette is
set to black.
On the opposite side of
the tube image on your tag,
draw out a doodle design
on your tag.
Convert to raster.
Lower the opacity on the doodle
to 20%.
Merge layers visible.
Add a new raster layer.
Fill with black or color of
choice.
Click this layer with your
magic wand tool. Selections
modify -contract by 4.
Press delete.
Select none.
Merge visible again.
Apply the plugin Xero Porcelain.
Softness 50 Strength & Brightness 128.
Add artist copyright information.
Add name for tag.
Save as png.
Thanks for trying my tutorial.
Saturday, January 25, 2014
I did this template as a tag challenge in CDO Group. I figured we are all siggie piggies
so I would go along that route for the template lol.
Here is a preview of the template

and you can dowload it here
You are welcome to use in challenges just be sure
to send them to my blog to find it.
Here is also a tag I did with the template. I used 2 piggies on it by Maxine Gadd
and a matching IB Scrap by Ladyhawwk Designs. You can find both available at
CDO.

so I would go along that route for the template lol.
Here is a preview of the template

and you can dowload it here
You are welcome to use in challenges just be sure
to send them to my blog to find it.
Here is also a tag I did with the template. I used 2 piggies on it by Maxine Gadd
and a matching IB Scrap by Ladyhawwk Designs. You can find both available at
CDO.

Friday, January 3, 2014
A note about this tutorial. This tutorial came out of a tag challenge. The challenge was to use a quote & create an uplifting, inspiring tag. I really wanted to use this tube because the horse has patches/spots like I do. See I have Vitligo and my skin is two colors. You can read more about it here
As I couldn't find anything to put the tube with, I decided to design my own
tutorial.
Patches

This tutorial was written
by Sarah Fiack on
January 3,2013
Any resemblance to another
tutorial is purely coincidental.
I am using a tube by Concetta Kilmer.
You can purchase this tube at
CDO.
Plugin:
Muras Meister Copies
Open up a 600x250 new image.
Open up a tube of choice as well.
On your matierals palette,
click on the top square.
Select a darker color from
your tube.
Fill your new image with
that color.
Add a new raster layer.
Select your freehand selection
tool. Draw a random shape
on the right hand side of
the image. Any shape is fine
its up to you.
Selections-modify-expand
by 1.
Fill this layer with a lighter
color from your tube.
Select none.
Paste your tube as a new
layer. Apply the plugin
Muras Meister Copies
Line- change the number
setting so that you have
the tube filling across your tag.
I used the number 3 for mine.
On the tube line layer, on
your layer palette, change the blend
mode to hard light.
Paste your tube again as
a new layer. Move this one to
the left side of the tag.
Add a drop shadow to the layer.
2,2,50,5 black.
Merge layers visible.
Add a new raster layer.
Fill with the first color - the
darker of the ones you used.
Select this layer with your
magic wand tool.
Selections - modify-contract by 4.
Press delete on your keyboard.
Select none.
Add new raster layer.
Fill with the lighter color.
Select this layer with your
magic wand tool.
Selections - modify-contract by 5.
Press delete on your keyboard.
Select none.
Move the lighter border layer
underneth the darker border layer.
Add a wordart or text of choice.
I used my own wording which
reflects myself.
if using text, make sure to
convert to raster.
Also add a drop shadow
to the words regardless of
text/wordart.
2,2,50,5 black.
Add artist copyright information
& name for the tag.
Save as png.
Thanks for trying my tutorial.
Tuesday, December 31, 2013
New Years Forum Set


Note this was written at request for a New tagger. To help her learn
how to use psp/scrapkit/forum style tags
This tutorial was written
by Sarah Fiack on
December 31,2013
Any resemblance to another
tutorial is purely coincidental.
For this tutorial, I’m using
a tube by Keith Garvey
You can purchase his tubes at
his store
Supplies:
Tube of choice
Scrap of choice.
I am using one called Happy New Year by
Amy Marie. It is also available
at her store.
Open a 600x250 new image.
Open up your tube & scrap
supplies of choice.
Select your magic wand tool.

Click on your new image.
Open a paper of choice.
Copy and paste the paper
as a new layer.
Selections - invert.
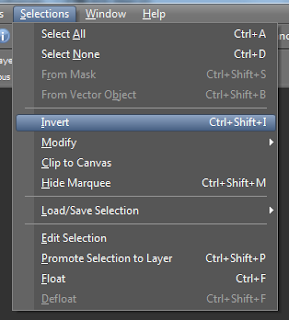 Press delete button on
your keyboard.
Open a banner element.
Copy and paste as new layer.
Move to the bottom of the tag.

Move over so it covers
only half of the bottom
of the tag.
On your layer palette in your psp,
right click on this layer.
Duplicate once
 & go to Image menu - mirror.

This way it covers along the
bottom of the whole tag.
Select none.
Open a tube closeup.
Paste as a new layer.
Using your move tool,
position your tube where
you would like it on your tag.

Open a drink element.
Image -Menu tab
Resize 70%.

On your layer palette,
click the paper layer.
Copy and paste the drink
element as a new layer.
Select your move tool.
Move the drink to the left side
of the tag.
Open a cupcake element.
Image menu tab - resize 55%.
Copy and paste as a new layer.
Select your move tool again & move
the cupcake layer to the right
hand side of the tag.
Effects - 3D effects - drop shadow
 Settings Vertical 2 Horizontal 2
Opacity 25 Blur 5.00
color Black. Make sure shadow
on new layer is not checked.

Apply the drop shadow to the
tube, cupcake and drink layers.
Merge layers visible.
Go to Layers menu - New
raster layer.

Blend Mode normal
Opacity 100 Link 0
Click Okay.
 Select your flood fill tool.
On your Materials palette, select
the top square with your mouse.
This is the stroke/foreground one.

Click on the square to bring up
the bigger materials square.
Click on the current square to
select a new color.
Click on your tag to choose a
color of choice from it.
Click okay.
Now floodfill the new layer with
the color you just selected.
Go to selections - modify -contract
change the number to 5.
Click okay/apply.
Tap the delete button on your keyboard.
Selections - select none.
On your Materials palette again, this time
choose the bottom of the two squares.
Choose black.
Now choose your font/text tool.

On your text tool options, select an easy
to read font. I am using Arial size 5 but this
may vary on your computer.

Now click on your tag image. You should have a
text box pop up to type out the artist
copyright information in.

To do the copyright symbol ©
Hold down Alt button & press the
numbers 0169 while holding alt.
It may vary on a laptop I'm not sure.
Tags require artist name, url and license
if you are using a PTu artist.
Click okay.
Convert text to raster.
merge layers visible.
-------------------Avatar---------------------------------
To do avatar. Open a new image
size 200x200. Fill with the
color of the top square in the
materials palette.
Click the image with the magic
wand tool.
Copy your tag image.
Paste as a new layer onto your
smaller image.
Use your move tool to position
as wanted on the avatar.
Selections menu - invert
& press delete button on your keyboard.
Move the color layer to above the image layer
in your layer palette.
Click the color layer with your magic wand
tool. Selections menu - modify -expand by 5.
Press delete button on keyboard.
Select your text tool again.
This time you only need the artist name
& license for the copyright. Avatars only
requrie that much due to size.
Convert your text to raster.
Merge layers visible.
Add whatever name you perfer on your
tag sets with a font of choice.
Save both the tag & avatar as png
or jpeg - whichever method you perfer.


Note this was written at request for a New tagger. To help her learn
how to use psp/scrapkit/forum style tags
This tutorial was written
by Sarah Fiack on
December 31,2013
Any resemblance to another
tutorial is purely coincidental.
For this tutorial, I’m using
a tube by Keith Garvey
You can purchase his tubes at
his store
Supplies:
Tube of choice
Scrap of choice.
I am using one called Happy New Year by
Amy Marie. It is also available
at her store.
Open a 600x250 new image.
Open up your tube & scrap
supplies of choice.
Select your magic wand tool.

Click on your new image.
Open a paper of choice.
Copy and paste the paper
as a new layer.
Selections - invert.

your keyboard.
Open a banner element.
Copy and paste as new layer.
Move to the bottom of the tag.

Move over so it covers
only half of the bottom
of the tag.
On your layer palette in your psp,
right click on this layer.
Duplicate once


This way it covers along the
bottom of the whole tag.
Select none.
Open a tube closeup.
Paste as a new layer.
Using your move tool,
position your tube where
you would like it on your tag.

Open a drink element.
Image -Menu tab
Resize 70%.

On your layer palette,
click the paper layer.
Copy and paste the drink
element as a new layer.
Select your move tool.
Move the drink to the left side
of the tag.
Open a cupcake element.
Image menu tab - resize 55%.
Copy and paste as a new layer.
Select your move tool again & move
the cupcake layer to the right
hand side of the tag.
Effects - 3D effects - drop shadow

Opacity 25 Blur 5.00
color Black. Make sure shadow
on new layer is not checked.

Apply the drop shadow to the
tube, cupcake and drink layers.
Merge layers visible.
Go to Layers menu - New
raster layer.

Blend Mode normal
Opacity 100 Link 0
Click Okay.

On your Materials palette, select
the top square with your mouse.
This is the stroke/foreground one.

Click on the square to bring up
the bigger materials square.
Click on the current square to
select a new color.
Click on your tag to choose a
color of choice from it.
Click okay.
Now floodfill the new layer with
the color you just selected.
Go to selections - modify -contract
change the number to 5.
Click okay/apply.
Tap the delete button on your keyboard.
Selections - select none.
On your Materials palette again, this time
choose the bottom of the two squares.
Choose black.
Now choose your font/text tool.

On your text tool options, select an easy
to read font. I am using Arial size 5 but this
may vary on your computer.

Now click on your tag image. You should have a
text box pop up to type out the artist
copyright information in.

To do the copyright symbol ©
Hold down Alt button & press the
numbers 0169 while holding alt.
It may vary on a laptop I'm not sure.
Tags require artist name, url and license
if you are using a PTu artist.
Click okay.
Convert text to raster.
merge layers visible.
-------------------Avatar---------------------------------
To do avatar. Open a new image
size 200x200. Fill with the
color of the top square in the
materials palette.
Click the image with the magic
wand tool.
Copy your tag image.
Paste as a new layer onto your
smaller image.
Use your move tool to position
as wanted on the avatar.
Selections menu - invert
& press delete button on your keyboard.
Move the color layer to above the image layer
in your layer palette.
Click the color layer with your magic wand
tool. Selections menu - modify -expand by 5.
Press delete button on keyboard.
Select your text tool again.
This time you only need the artist name
& license for the copyright. Avatars only
requrie that much due to size.
Convert your text to raster.
Merge layers visible.
Add whatever name you perfer on your
tag sets with a font of choice.
Save both the tag & avatar as png
or jpeg - whichever method you perfer.
Friday, November 15, 2013
New template by me today.It's a forum style template using the shapes
circles & rectangles.
FTU - feel free to snag & use. If used as a challenge, please
send them to my blog to snag it.

Preview of template as a tag. For the tag, I used the artist Michi Art - tubes are available at CDO

Download Here
circles & rectangles.
FTU - feel free to snag & use. If used as a challenge, please
send them to my blog to snag it.

Preview of template as a tag. For the tag, I used the artist Michi Art - tubes are available at CDO

Download Here
Tuesday, September 24, 2013
Constellation Dream

This tutorial was written
by Sarah Fiack on
September 24th, 2013
Any resemblance to another
tutorial is purely coincidental. I am
using a PTU tube by CyberCat Graphics.
It is available at UYA Here
Plugins:
Mura's Meister Copies
Eye Candy 5 Nature: Squint
Xenofex 2 Constellation
Open a 600x250 new image.
Open up your tube of choice.
Paste your tube as a new layer.
Position as wanted on the image.
Duplicate the layer.
Add a drop shadow to
the top tube layer.
2,2,50,5 Black.
On the bottom layer, apply
the plugin Mura's Meister
Copies Wallpaper rotate
default settings.
Make sure you have the bottom
layer selected in your layer palette.
Selections - select all
Now select your wallpaper
layer on your layer palette.
Image - crop to selection.
Repeat the select all
of the bottom layer.
Now select the top tube layer.
Crop to selection.
On the wallpaper layer,
apply Adjust Blur - Motion blur.
Angle 50 Strength 100
Now apply the plugin
Eye Candy 5 Nature: Squint
Setting: Dream Sequence
Effects
Edge effects
Enhance more
Effects -Artistic Effects
Balls & Bubbles
Shape: Single ball or bubble selected
Surface: Opacity 20
Shininess 34 Gloss 15
Click okay.
Resize this layer 70%
Duplicate twice. Position one
on the left side behind your tube.
Position the other one right side
in front of your tube.
Duplicate this bubble once.
Resize again 70%. Position on
the left bottom side in front of your tube.
On each of the bubble layers, apply the
plugin Xenofex 2 Constellation
Setting Low Denisty Stars default settings.
Make sure Keep original image box is checked.
Merge layers. Add a new raster layer.
Fill with a color of choice from your tag.
Select this layer with your magic wand tool.
Selections modify contract by 5.
Press delete button. Select none.
Adjust add noise.
Uniform 35.
Add the earlier drop shadow to the border.
Select your font tool.
Choose a font of choice.
Type out a single word which
fits your tag. Position on the
bottom right side of the tag.
Convert to raster.
Add the earlier drop shadow to it as well.
Merge the layers visible.
Add artist copyright and name to the tag.
Save as png. Thanks for trying my tutorial.

This tutorial was written
by Sarah Fiack on
September 24th, 2013
Any resemblance to another
tutorial is purely coincidental. I am
using a PTU tube by CyberCat Graphics.
It is available at UYA Here
Plugins:
Mura's Meister Copies
Eye Candy 5 Nature: Squint
Xenofex 2 Constellation
Open a 600x250 new image.
Open up your tube of choice.
Paste your tube as a new layer.
Position as wanted on the image.
Duplicate the layer.
Add a drop shadow to
the top tube layer.
2,2,50,5 Black.
On the bottom layer, apply
the plugin Mura's Meister
Copies Wallpaper rotate
default settings.
Make sure you have the bottom
layer selected in your layer palette.
Selections - select all
Now select your wallpaper
layer on your layer palette.
Image - crop to selection.
Repeat the select all
of the bottom layer.
Now select the top tube layer.
Crop to selection.
On the wallpaper layer,
apply Adjust Blur - Motion blur.
Angle 50 Strength 100
Now apply the plugin
Eye Candy 5 Nature: Squint
Setting: Dream Sequence
Effects
Edge effects
Enhance more
Effects -Artistic Effects
Balls & Bubbles
Shape: Single ball or bubble selected
Surface: Opacity 20
Shininess 34 Gloss 15
Click okay.
Resize this layer 70%
Duplicate twice. Position one
on the left side behind your tube.
Position the other one right side
in front of your tube.
Duplicate this bubble once.
Resize again 70%. Position on
the left bottom side in front of your tube.
On each of the bubble layers, apply the
plugin Xenofex 2 Constellation
Setting Low Denisty Stars default settings.
Make sure Keep original image box is checked.
Merge layers. Add a new raster layer.
Fill with a color of choice from your tag.
Select this layer with your magic wand tool.
Selections modify contract by 5.
Press delete button. Select none.
Adjust add noise.
Uniform 35.
Add the earlier drop shadow to the border.
Select your font tool.
Choose a font of choice.
Type out a single word which
fits your tag. Position on the
bottom right side of the tag.
Convert to raster.
Add the earlier drop shadow to it as well.
Merge the layers visible.
Add artist copyright and name to the tag.
Save as png. Thanks for trying my tutorial.
Thursday, September 12, 2013
Keep Out


This tutorial was written
by Sarah Fiack on
September 12th, 2013
Any resemblance to another
tutorial is purely coincidental.
I am using the PTU scrap
Hocus Pocus by Inzpired Creationz
available at PMTWS
Plugins Xero: Bad Dream
Xero Soft Vignette
VM Distortion Broken Mirror
Open a 600x250 new image.
Open up your scrap supplies of choice.
Click your new image with your magic
wand tool. Paste a paper of choice
as a new layer. Selections invert
& press delete.
Paste your cupcake of choice
as a new layer. Position as wanted
on the tag. I moved mine to the left
side of the tag. Press delete.
Open a teddy bear element.
Resize 50%. Paste as new layer
by the cupcake element.
Select none.
Add a drop shadow to the cupcake
and bear layers. 2,2,50,5 black.
Open a wooden sign. Resize 70%
or as needed. paste to right side
& slightly behind the previous
element layers. You want it sticking out
from the cupcake and bear.
Duplicate the paper layer once.
Make sure the duplicate layer is selected
in your layer palette. Apply the plugin
Xero: Bad Dream default settings
Now apply the plugin Xero
Soft Vignette
Gradient shape Elliptical
Effect type foreground colour
Pattern type Solid
Repeats width Height all 0
Strength 255
On the same duplicate layer,
apply VM Distortion Broken Mirror
default settings.
Add the earlier drop shadow to the layer.
Merge layers. Add a new raster layer.
Fill with a color of choice from your tag.
Click this layer with your magic wand tool.
Selections modify contract by 5.
Press delete button. Ta da instant border.
Select none.
Add a drop shadow to the layer.
To make the avatar:
Open a 150x200 ( or desired size ) new image.
Click this image with your magic wand.
Copy your merged layer & paste onto your
avatar as a new layer. Selections invert
& press delete.Select none.
Move the bottom layer to the top
in your layer palette. Fill with a color
of choice - I used same color for border
of tag.
Click the layer with magic wand tool.
Selections modify contract by 5.
Press delete.
Select none.
Bingo you have an avatar.Make sure
to add a drop shadow.
Add copyright information &
name to both. Save as png.
Thanks for trying my tutorial.


This tutorial was written
by Sarah Fiack on
September 12th, 2013
Any resemblance to another
tutorial is purely coincidental.
I am using the PTU scrap
Hocus Pocus by Inzpired Creationz
available at PMTWS
Plugins Xero: Bad Dream
Xero Soft Vignette
VM Distortion Broken Mirror
Open a 600x250 new image.
Open up your scrap supplies of choice.
Click your new image with your magic
wand tool. Paste a paper of choice
as a new layer. Selections invert
& press delete.
Paste your cupcake of choice
as a new layer. Position as wanted
on the tag. I moved mine to the left
side of the tag. Press delete.
Open a teddy bear element.
Resize 50%. Paste as new layer
by the cupcake element.
Select none.
Add a drop shadow to the cupcake
and bear layers. 2,2,50,5 black.
Open a wooden sign. Resize 70%
or as needed. paste to right side
& slightly behind the previous
element layers. You want it sticking out
from the cupcake and bear.
Duplicate the paper layer once.
Make sure the duplicate layer is selected
in your layer palette. Apply the plugin
Xero: Bad Dream default settings
Now apply the plugin Xero
Soft Vignette
Gradient shape Elliptical
Effect type foreground colour
Pattern type Solid
Repeats width Height all 0
Strength 255
On the same duplicate layer,
apply VM Distortion Broken Mirror
default settings.
Add the earlier drop shadow to the layer.
Merge layers. Add a new raster layer.
Fill with a color of choice from your tag.
Click this layer with your magic wand tool.
Selections modify contract by 5.
Press delete button. Ta da instant border.
Select none.
Add a drop shadow to the layer.
To make the avatar:
Open a 150x200 ( or desired size ) new image.
Click this image with your magic wand.
Copy your merged layer & paste onto your
avatar as a new layer. Selections invert
& press delete.Select none.
Move the bottom layer to the top
in your layer palette. Fill with a color
of choice - I used same color for border
of tag.
Click the layer with magic wand tool.
Selections modify contract by 5.
Press delete.
Select none.
Bingo you have an avatar.Make sure
to add a drop shadow.
Add copyright information &
name to both. Save as png.
Thanks for trying my tutorial.
Monday, September 9, 2013
Halloween City

This tutorial was written
by Sarah Fiack on
September 9th, 2013
Any resemblance to another
tutorial is purely coincidental.
I am using the PTU scrap
Halloween City by Inzpired Creationz
available at PMTWS
Open a 600x250 new image.
Open up your scrap supplies.
On your new image, select with
your magic wand tool.
Paste a scrap paper of choice
as a new layer. Selections invert
& press delete.
Open a tree/grass element.
Resize 80% or as needed.
Paste as a new layer on
top of the paper layer.
Press delete.
Open a haunted house element.
Resize 80%. Paste as a new layer
on the opposite side of the tree.
Select none.
Add a drop shadow to the house
& tree layers. 2,2,50,5 Black.
Open stars element. Resize 50%
Rotate 90 either direction.
Click on the paper layer.
Paste the stars as a new layer.
Open a crescent moon element.
Resize 25%. Paste as a new layer
beside the stars.
Choose a character tube from
the scrap. Paste as new layer.
Position in the center of your tag
& as the top layer.
For me, I did one with a black cat cupcake
and one with a skully dude.
Drop shadow the character.
Add a new raster top layer.
Fill with color of choice from tag.
Select this layer with your magic wand.
Selections modify contract by 5.
Press delete.
Select none.
On the border you just made,
Adjust add noise - uniform 45.
Add the earlier drop shadow as well.
Merge layers visible.
Add copyright information and name.
Save as png.
Thanks for trying my tutorial.


This tutorial was written
by Sarah Fiack on
September 9th, 2013
Any resemblance to another
tutorial is purely coincidental.
I am using the PTU scrap
Halloween City by Inzpired Creationz
available at PMTWS
Open a 600x250 new image.
Open up your scrap supplies.
On your new image, select with
your magic wand tool.
Paste a scrap paper of choice
as a new layer. Selections invert
& press delete.
Open a tree/grass element.
Resize 80% or as needed.
Paste as a new layer on
top of the paper layer.
Press delete.
Open a haunted house element.
Resize 80%. Paste as a new layer
on the opposite side of the tree.
Select none.
Add a drop shadow to the house
& tree layers. 2,2,50,5 Black.
Open stars element. Resize 50%
Rotate 90 either direction.
Click on the paper layer.
Paste the stars as a new layer.
Open a crescent moon element.
Resize 25%. Paste as a new layer
beside the stars.
Choose a character tube from
the scrap. Paste as new layer.
Position in the center of your tag
& as the top layer.
For me, I did one with a black cat cupcake
and one with a skully dude.
Drop shadow the character.
Add a new raster top layer.
Fill with color of choice from tag.
Select this layer with your magic wand.
Selections modify contract by 5.
Press delete.
Select none.
On the border you just made,
Adjust add noise - uniform 45.
Add the earlier drop shadow as well.
Merge layers visible.
Add copyright information and name.
Save as png.
Thanks for trying my tutorial.

Saturday, August 24, 2013
I wanted to feature this forum set I made today. It uses the Violin tube set by The Hunter and
matching scrap by Bibi - both available at SATC. I also used the lyrics of the song For Those Who Wait by the band Fireflight. I absolutely love the message in the video & song. When I saw
the tubes & scrap that song immediately came to mind. It is very inspiring and motivating.


matching scrap by Bibi - both available at SATC. I also used the lyrics of the song For Those Who Wait by the band Fireflight. I absolutely love the message in the video & song. When I saw
the tubes & scrap that song immediately came to mind. It is very inspiring and motivating.


Wednesday, August 14, 2013

Sexy Spook
This tutorial was written
by Sarah Fiack on
August 14,2013
Any resemblance to another
tutorial is purely coincidental.
I am using a tube by Artplicit
which you can purchase at
MTA.
Mask by Lithium Flowers
Forumsetmask38_Lightning_LF
Here
Plugins:
Mura's Meister Copies
EyeCandy 4000 Shadowlab
& Gradient Glow
Open a 600x250 new image.
Open up your tube of choice.
Select your flood fill tool.
On your Materials palette
Stroke box - set to white.
Fill your new image with
this color.
Add a new raster layer.
On your Materials palette
Stroke box - set to a dark
color from your tube.
Fill the new layer with this color.
Apply the mask
Forumsetmask38_Lightning_LF
Merge group.
Paste your tube as a new layer.
Position as wanted on the tag.
Apply the plugin Mura's Meister Copies
Tiling - make sure tile gap is set at 2.
To the tiled tubes, change the blend mode
on your layers palette to Luminance. Lower the
opacity to 46.
Paste your tube again & position in the
center of the tag.
EyeCandy 4000 Shadowlab
Setting Faint Drop Shadow
Default settings.
Add a new raster layer to the top
of your tag. Fill with a dark color.
Select this layer with your magic wand tool.
Selections contract by 5.
Press delete.
Select none.
EyeCandy4000 Gradient Glow
Change the color to red or color of choice.
Glow width 3.00
Apply to the border you just made.
Select your text tool.
Choose a font of choice and text
color of choice. Add text of choice.
Convert to raster.
Add artist copyright information and
name. Save as png. Thanks for trying my tutorial.
Wednesday, April 10, 2013

Twin Hearts
This tutorial was written
by Sarah Fiack on
April 10,2013
Any resemblance to another
tutorial is purely coincidental.
For this tutorial, I’m using a tube
by Markia. You can purchase it
at CDO.
No scraps are needed.
Plugins:
Mura's Meister Copies
Unplugged Shapes Twin Rings
Xero Porcelain
EyeCandy 4000 Gradient Glow
Open up a tube of choice along
with a new image 600x250.
Fill your new image with a color
from your tube.
Copy & paste your new tube
as a new layer above the fill layer.
Apply the plugin
Mura's Meister Copies
Wallpaper rotate default settings.
Select your fill layer with your magic
wand tool.
Make sure your copies layer is
selected in the layers palette.
Selections invert & press delete.
Select none.
Duplicate this layer.
On the top layer, apply the plugin
Unplugged Shapes Twin Rings
Default settings.
Now with the magic wand again,
click inside each part that is colored.
You may have to hold shift button down
while doing this to keep them all selected.
Press delete on your keyboard.
Select none.
Add a drop shadow to the selected layer.
2,2,25,5 Black.
Apply Xero Porcelain to the other wallpaper layer.
Default settings.
Paste your tube again on the top layer.
Position as wanted on the tag.
Add the above drop shadow as well to it.
Take your preset shape tool.
Select a heart shape.
Draw out a heart on one side of your
main tube. Convert to raster.
Fill with a color of choice.
Duplicate the heart once.
Mirror the heart copy.
Merge the two hearts together.
Adjust add noise - uniform 25
to the hearts.
EyeCandy 4000 Gradient Glow
Setting fat Glow width 3.00
apply to the hearts.
Merge layers visible.
Add a new raster layer to
the tag. Fill with a 2nd color from
the tag. Select with your magic wand.
Selections contract by 5.
Press delete button.
Select none.
You now have a border for the tag!
Apply the earlier adjust noise.
Merge layers.
Add artist copyright & name to the tag.
Save as png.
Thanks for trying my tutorial!
Friday, January 18, 2013

Rainbow Socks
This tutorial was written
by Sarah Fiack on
January 18,2013
Any resemblance to another
tutorial is purely coincidental.
For this tutorial, I’m using a
tube by Amberly Berendson
You can purchase this tube at
MTA
Supplies:
Tube of Choice
Plugins:
EyeCandy4000 Gradient Glow
Open a 600x250 new image.
Open up a tube of choice too.
One with multiple colors works great
with this.
Fill with a lighter color from your
new tube.
Now select your rectangle preset
shape tool.
On your materials palette,change
both colors to white. This is a good
base color.
With your preset shape tool,
draw out a long narrow rectangle
along the length of your image.
Convert to raster.
Move the rectangle layer to the
top of the image.
Duplicate 5 more times.
Arrange the layers going down
the image. Make sure you leave a space
between each rectangle. You want to see the
underneath color.
Now hide the bottom layer for the moment.
Merge visible the rectangle layers.
Select your fill tool.
Change the stroke on the materials palette,
to a color from your tube. Fill the top rectangle
with the color.
Repeat this with the next rectangle and with a
different color from the tube.
I did the colors to reflect the socks the tube has on.
Now we're going to add noise to the layer.
Adjust - add noise
35 uniform
Monochrome checked
Once all the rectangles are filled,
apply EyeCandy 4000 Gradient Glow
Black halo 3.00
Then apply the Glow Fat 3.00
Unhide the bottom layer.
Paste your main tube as a new layer as top layer.
Position to the side of the tag.
Mirror.
On your layers palette, change
the blend mode to hard light.
Paste your tube again & position
as originally before the mirror step.
Add a drop shadow to both the rectangles
and the 2nd tube layer.
2,2,50,5 Black
Add a new raster layer on the top layer.
Fill with white or color of choice.
Click this layer with your magic wand.
Selections contrast by 3.
Press delete on your keyboard.
Select none.
Add artist copyright & name.
Save as wanted.
Thanks for trying my tutorial.
Saturday, December 8, 2012

Reindeer Republic
This tutorial was written
by Sarah Fiack on
December 8 ,2012
Any resemblance to another
tutorial is purely coincidental.
I am using a tube by Lollipop Labs
which is available at
PSPTUBESTOP
No plugins needed but does use
Animation Shop.
Open a 600x250 new image.
Open up your tube of choice.
Fill your new image with a color
of choice from your tube.
Now select your rectangle preset
shape tool.
On your Materials palette,
select the colors to both be
the same color - I used red
for mine.
Now draw out a thin rectangle that
goes across your tag. Convert this
layer to raster. Duplicate this layer 6 times
for a total of 7 layers.
Position in cascading rows along your tag.
Be sure to allow some of your background
layer to peek through between the rows.
Once all the rows are positioned,
choose a different Stroke color on your
materials palette. Fill every other rectangle
row with this color. On my tag I used
white for this part.
Okay back to the Materials palette.
This time choose the same color for
Stroke as the Background. Choose a
smiliar but lighter color for Fill.
Draw out a square on the
left hand side of your tag.
Make sure your width is set at 8.00
Convert to raster.
Resize your tube 80% if needed.
Click inside the square with your
magic wand tool.
Paste your tube as a new layer.
Position as wanted inside the square.
Selections invert & press delete.
Select none.
Add a drop shadow to the tube layer.
2,2,50,5 Black
Back to the rectangle rows layer.
Click on the red rows ( or color of choice )
Hold shift button down while selecting to
keep all the previous rows selected.
Adjust add noise Uniform 75
Select none.
Select your font tool & choose a font
of choice. I used color black for my text
color. Add text of choice to the white
rectangle layers. Convert to raster.
Hide your tube layer for a second.
Merge visible the remaining layers.
Now unhide the tube layer.
Add a new top raster layer.Fill with a color
of choice from your tag. Click this layer
with your magic wand tool.
Selections modify contract by 4.
Press delete. Select none.
Add artist copyright & name to the tag.
If you don't wish to animate, you can also
save. To animate, please continue.
Animation:
Copy merged & paste into Animation shop
as a new animation.
Now back in PSP, select with your magic
wand, the nose of your tube ( or the part
which you have blinking )
Fill with a darker shade from the original
color.Select none.
Copy merged & return to AS.
Paste after current frame
Edit select all
Animation -Frame properties
Change to 20.
View animation
If happy with the speed of the animation &
everything, then save as gif.
Thanks so much for trying my tutorial!
Monday, November 26, 2012

Touched By A Brush
This tutorial was written
by Sarah Fiack on
November 26,2012
Any resemblance to another
tutorial is purely coincidental.
I am using a tube by Adam Braun
which you can purchase at
CDO
Plugins
Muras Meister Copies
Supplies:
Tube of choice
Open a 600x250 new image.
Open a tube of choice.
Fill your new image with a color from
your tube.
Copy & paste your tube as a new layer.
Position along a side of your image.
Duplicate the tube once.
X out & hide the copy layer.
Make sure the original tube layer is selected
in your layer palette.
Effects Plugins
Muras Meister Copies
Wallpaper rotate - default settings.
Adjust blur -motion blur
Angle 45
Strength 100
Effects Art Media Effects
Default settings
Effects -Texture effects
Texture Hatch Fine Color white
Size % 100 Smoothness 11
Depth 6 Angle 182
Ambience -26 Intensity 35
Shininess 15 Elevation 80
Unhide the tube copy layer.
Add a subtle drop shadow to the tube.
Choose your text tool.
Choose colors from your tag for your text.
Type out text of choice & convert to raster.
Duplicate the text layer twice.
On the original text layer, repeat the above
steps of motion blur, brush strokes &
Texture.
Next, Effects - 3D Effects,
Inner Bevel
Choose Bevel 2 Width 24
Smoothness 39 Depth 12 Ambience 23
Shininess 18 Angle 315 Intensity 40
Elevation 35
Finally apply the drop shadow that you
applied to the tube layer earlier as well.
Merge layers visible.
Add a new raster layer.
Fill with a slightly darker color from tag.
Click this layer with your magic wand tool.
Selections modify contract by 3.
Press delete button.
Select none.
Add artist copyright information.
Save as png.
Thanks for trying my tutorial!
Friday, September 7, 2012

Tears In Shower
This tutorial was written
by Sarah Fiack on
September 6, 2012
Any resemblance to another
tutorial is purely coincidental.
For this tutorial, I’m using a
tube by Zindy. You can purchase this
tube at her store.
Zindy Zone
Supplies:
Tube of choice.
Plugins:
VM Toolbox
AAA Frames Foto Frame
Open a 600x250 new image.
Open up a tube of choice.I suggest
a tube sitting as if in a corner.
Fill your new image with a
light grey or color of choice
from tube.
Resize your tube 80%.
Paste on a side of choice
on your new image.
I pasted mine on the left side.
Select your selection tool.
Select a very narrow horizontal rectangle
near the bottom of the tag.
Layers -New raster layer.
Fill with a color slightly darker
than original fill color.
Select none.
This should give the illusion of a
wall & floor edge.
Effects -3D Effects -Inner Bevel
Bevel 2 width 2
Image smoothness 50 depth 12
Ambience 3 Shininess 8 Angel 45
Intensity 30 Elevation 40.
Use your selection tool again.
Make sure the bottom fill layer is selected
in your layer palette.
Select around the back "wall" part of the tag.
Click on the layer -
Promote selection to new layer.
Apply the plugin VM Toolbox -Grid.
Default settings.
Staying on this layer, click inside one
of the squares with your magic wand tool.
Now hold the shift button down & select
various random other squares on this layer.
On the selected squares, adjust
add noise Uniform 25.
Choose your font tool.
Select a font which appears to be
"laying down or flat".
Select a cooresponding color to
your tag.
Add your text of choice along the
"floor" of the tag by your tube.
Merge your layers visible.
Apply the plugin AAA Frames Foto Frame.
Change the width setting to 2.
Add artist copyright information.
Add name you wish on tag.
Save as png.
Thanks for trying my tutorial.
Thursday, August 2, 2012

This tutorial was written
by Sarah Fiack on
August 2, 2012
Any resemblance to another
tutorial is purely coincidental.
For this tutorial, I’m using a
tube by Daniel Esparza
You can purchase this tube at
CDO.
Supplies:
Tube of Choice
SpawnsFSMask98 Blog
Plugins:
Muras Meister Copies
Xero Radiance
EyeCandy4000 Gradient Glow
Animation Shop
Open a 50x250 new image.
Fill with black.
Now open a 600x250 new image.
Copy & paste the black image
5x along the new image.
Merge the black layers together.
Using your magic wand,
select the first two black
images on the left side of the your tag.
Paste your tube as a new layer.
Selections invert &
press delete.
Select none.
This should leave the tube
on the two black images.
Repeat this with the last
two black images on the right side.
You also want to do the center one
as well.
Merge the tube layers & black
images together.
Paste your tube as a new layer.
In your layer palette, move this
layer to the bottom layer of your tag.
Apply these plugins to the layer.
Muras Meister Copies
WallPaper Rotate default settings.
Xero Radiance Default settings.
Back on the black bar layer,
EyeCandy 4000 Gradient Glow
Fat setting glow width 3.00
Repeat a 2nd time except this time with Black Halo.
Add a new raster layer to above the bottom layer of
the tag. Fill this layer with white or light color
from your tag.
Apply the mask SpawnsFSMask98.
Make sure Invert this layer is checked.
Merge group.
Apply gradient glow Black Halo glow width 3.00
to this layer.
Add text or wordart of choice to the tag.
I did black for my Fill color and white for my
stroke color. Stroke width 1.0.
Position as wanted on the tag & convert to raster.
Add a new top raster layer.
Fill with black or dark color.
Select this layer with your magic wand tool.
Selections modify contrast by 4.
Press delete button.
Select none.
Adjust add noise Uniform 25.
Now merge the border layer with the
wordart layer..
Add artist copyright information & name.
We're going to get ready to animate the tag.
If you don't wish to animate, you can save it now.
Open Animation shop.
Copy merged and paste as new animation.
Return to PSP.
Duplicate the 5 bar tube layer.
Move the copy layer to the left.
You want it to appear beside the original layer.
Copy merged and return to AS.
Paste after current frame on the original image
you pasted.
Return to PSP.
Edit undo move.
Copy merged & paste after Frame 2 in AS.
This should be your 3rd frame in there.
Now you want to repeat the movement of
the duplicated layer. Except this time you want
to move the layer to the right of the original bar layer.
Copy merged & paste after the 3rd frame.
This should give your 4 frames so far.
Now we're going to stay in AS.
Edit -select all - copy.
Paste as new animation.
Edit -select all
Animation - Reverse Frames.
Edit -Select all -copy
Back to original animation.
Click on frame 4.
Paste after frame 4.
This should give you 8 frames total.
Edit -select all.
Animation -Frame properties -change to 20.
View animation.
If happy, save as gif.
If not, tweak & adjust as wanted.
Thanks for trying my tutorial!
Subscribe to:
Posts
(Atom)
Zone Award
