






Showing posts with label Learning. Show all posts
Showing posts with label Learning. Show all posts
Wednesday, October 26, 2016

This tutorial was written
by Wicked Cupcake on
October 26,2016
Any resemblance to another
tutorial is purely coincidental.
Open a 700x700 new image.
Select your tube image of choice.
Select your preset Rectangle shape tool.
Make sure to set it to the Square shape option.
On your Materials Palette, hide your Foreground/
Stroke Color Palette box. On the Background/Fill
Choose a dark color from your tube for the color.
Now with the shape tool, draw out a square shape
to the desired size you want for it.
Objects - Align - Center in Canvas. Convert this
layer to raster.
Choose your Ellipse preset shape tool.
Now select the circle shape option on it.
On your Materials Palette, change the
color to white.
Draw out a small circle shape. Convert to raster.
Duplicate this layer four times for a total of five
layers. Arrange around the square as wanted.
Merge the circle layers together.
Select the square layer with your magic wand tool.
Selections - invert.
On the circle layer, press delete on your keyboard.
Select none.
Merge the two shape layers together.
Go to Effects - 3D Effects - Inner Bevel.
Select the Bevel option 3 & click okay.
Paste your tube as a new layer. Arrange on
the shape layer as wanted.
Back on your Materials palette, choose a 3rd
color of choice from your tube for the Background color.
Leave the Foreground color hidden still.
On your Preset shape tool, choose a heart or shape
of choice that fits your tag. I chose to use a heart shape.
Draw out one small heart along your shape layer.
Convert to raster & duplicate once - mirror. Position
this layer as wanted on the tag.
Add a subtle drop shadow the small shape layer we just made.
Select your font tool. Choose a font of choice.
Near the bottom of your tag, click with your mouse
to bring up the text box. Type out a word or two that
fits your tag. I used POLKADOTS for mine.
Once you are happy with the size, convert to raster.
We're going to apply a Gradient Glow to the word now.
Select the plugin EyeCandy4000 Gradient Glow - using
the color setting Fat & Glow width 3.00.
On Materials palette, go back to the earlier dark color that you
used on the square shape.
Now back to the Rectangle shape tool. Draw out a narrow horizontal
rectangle. Convert to raster. You want part of it to stick out from
behind the left side of the word. Duplicate this layer once
& move to the right side as wanted. I did position one near the top &
the other one on the bottom half of word.
Back to our merged shape layer. Duplicate this layer once.
Resize the copy layer 45%. Move this layer to the top left corner
& partially behind the orginal shape layer. You want it coming out from
behind the layer. Duplicate the copy layer once. Move this to the diagonal
right bottom corner. Position so it is coming out on the side of the big layer.
Merge layers visible & crop to desired size.
Add artist copyright information to the tag & save
as a png.
Thanks for trying my tutorial.
This tutorial was written
by Wicked Cupcake on
October 26,2016
Any resemblance to another
tutorial is purely coincidental.
Open a 700x700 new image.
Select your tube image of choice.
Select your preset Rectangle shape tool.
Make sure to set it to the Square shape option.
On your Materials Palette, hide your Foreground/
Stroke Color Palette box. On the Background/Fill
Choose a dark color from your tube for the color.
Now with the shape tool, draw out a square shape
to the desired size you want for it.
Objects - Align - Center in Canvas. Convert this
layer to raster.
Choose your Ellipse preset shape tool.
Now select the circle shape option on it.
On your Materials Palette, change the
color to white.
Draw out a small circle shape. Convert to raster.
Duplicate this layer four times for a total of five
layers. Arrange around the square as wanted.
Merge the circle layers together.
Select the square layer with your magic wand tool.
Selections - invert.
On the circle layer, press delete on your keyboard.
Select none.
Merge the two shape layers together.
Go to Effects - 3D Effects - Inner Bevel.
Select the Bevel option 3 & click okay.
Paste your tube as a new layer. Arrange on
the shape layer as wanted.
Back on your Materials palette, choose a 3rd
color of choice from your tube for the Background color.
Leave the Foreground color hidden still.
On your Preset shape tool, choose a heart or shape
of choice that fits your tag. I chose to use a heart shape.
Draw out one small heart along your shape layer.
Convert to raster & duplicate once - mirror. Position
this layer as wanted on the tag.
Add a subtle drop shadow the small shape layer we just made.
Select your font tool. Choose a font of choice.
Near the bottom of your tag, click with your mouse
to bring up the text box. Type out a word or two that
fits your tag. I used POLKADOTS for mine.
Once you are happy with the size, convert to raster.
We're going to apply a Gradient Glow to the word now.
Select the plugin EyeCandy4000 Gradient Glow - using
the color setting Fat & Glow width 3.00.
On Materials palette, go back to the earlier dark color that you
used on the square shape.
Now back to the Rectangle shape tool. Draw out a narrow horizontal
rectangle. Convert to raster. You want part of it to stick out from
behind the left side of the word. Duplicate this layer once
& move to the right side as wanted. I did position one near the top &
the other one on the bottom half of word.
Back to our merged shape layer. Duplicate this layer once.
Resize the copy layer 45%. Move this layer to the top left corner
& partially behind the orginal shape layer. You want it coming out from
behind the layer. Duplicate the copy layer once. Move this to the diagonal
right bottom corner. Position so it is coming out on the side of the big layer.
Merge layers visible & crop to desired size.
Add artist copyright information to the tag & save
as a png.
Thanks for trying my tutorial.
Tuesday, December 31, 2013
New Years Forum Set


Note this was written at request for a New tagger. To help her learn
how to use psp/scrapkit/forum style tags
This tutorial was written
by Sarah Fiack on
December 31,2013
Any resemblance to another
tutorial is purely coincidental.
For this tutorial, I’m using
a tube by Keith Garvey
You can purchase his tubes at
his store
Supplies:
Tube of choice
Scrap of choice.
I am using one called Happy New Year by
Amy Marie. It is also available
at her store.
Open a 600x250 new image.
Open up your tube & scrap
supplies of choice.
Select your magic wand tool.

Click on your new image.
Open a paper of choice.
Copy and paste the paper
as a new layer.
Selections - invert.
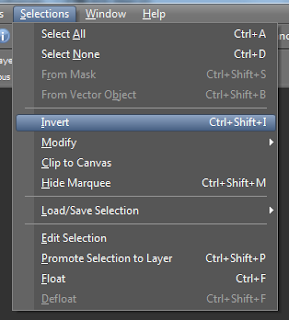 Press delete button on
your keyboard.
Open a banner element.
Copy and paste as new layer.
Move to the bottom of the tag.

Move over so it covers
only half of the bottom
of the tag.
On your layer palette in your psp,
right click on this layer.
Duplicate once
 & go to Image menu - mirror.

This way it covers along the
bottom of the whole tag.
Select none.
Open a tube closeup.
Paste as a new layer.
Using your move tool,
position your tube where
you would like it on your tag.

Open a drink element.
Image -Menu tab
Resize 70%.

On your layer palette,
click the paper layer.
Copy and paste the drink
element as a new layer.
Select your move tool.
Move the drink to the left side
of the tag.
Open a cupcake element.
Image menu tab - resize 55%.
Copy and paste as a new layer.
Select your move tool again & move
the cupcake layer to the right
hand side of the tag.
Effects - 3D effects - drop shadow
 Settings Vertical 2 Horizontal 2
Opacity 25 Blur 5.00
color Black. Make sure shadow
on new layer is not checked.

Apply the drop shadow to the
tube, cupcake and drink layers.
Merge layers visible.
Go to Layers menu - New
raster layer.

Blend Mode normal
Opacity 100 Link 0
Click Okay.
 Select your flood fill tool.
On your Materials palette, select
the top square with your mouse.
This is the stroke/foreground one.

Click on the square to bring up
the bigger materials square.
Click on the current square to
select a new color.
Click on your tag to choose a
color of choice from it.
Click okay.
Now floodfill the new layer with
the color you just selected.
Go to selections - modify -contract
change the number to 5.
Click okay/apply.
Tap the delete button on your keyboard.
Selections - select none.
On your Materials palette again, this time
choose the bottom of the two squares.
Choose black.
Now choose your font/text tool.

On your text tool options, select an easy
to read font. I am using Arial size 5 but this
may vary on your computer.

Now click on your tag image. You should have a
text box pop up to type out the artist
copyright information in.

To do the copyright symbol ©
Hold down Alt button & press the
numbers 0169 while holding alt.
It may vary on a laptop I'm not sure.
Tags require artist name, url and license
if you are using a PTu artist.
Click okay.
Convert text to raster.
merge layers visible.
-------------------Avatar---------------------------------
To do avatar. Open a new image
size 200x200. Fill with the
color of the top square in the
materials palette.
Click the image with the magic
wand tool.
Copy your tag image.
Paste as a new layer onto your
smaller image.
Use your move tool to position
as wanted on the avatar.
Selections menu - invert
& press delete button on your keyboard.
Move the color layer to above the image layer
in your layer palette.
Click the color layer with your magic wand
tool. Selections menu - modify -expand by 5.
Press delete button on keyboard.
Select your text tool again.
This time you only need the artist name
& license for the copyright. Avatars only
requrie that much due to size.
Convert your text to raster.
Merge layers visible.
Add whatever name you perfer on your
tag sets with a font of choice.
Save both the tag & avatar as png
or jpeg - whichever method you perfer.


Note this was written at request for a New tagger. To help her learn
how to use psp/scrapkit/forum style tags
This tutorial was written
by Sarah Fiack on
December 31,2013
Any resemblance to another
tutorial is purely coincidental.
For this tutorial, I’m using
a tube by Keith Garvey
You can purchase his tubes at
his store
Supplies:
Tube of choice
Scrap of choice.
I am using one called Happy New Year by
Amy Marie. It is also available
at her store.
Open a 600x250 new image.
Open up your tube & scrap
supplies of choice.
Select your magic wand tool.

Click on your new image.
Open a paper of choice.
Copy and paste the paper
as a new layer.
Selections - invert.

your keyboard.
Open a banner element.
Copy and paste as new layer.
Move to the bottom of the tag.

Move over so it covers
only half of the bottom
of the tag.
On your layer palette in your psp,
right click on this layer.
Duplicate once


This way it covers along the
bottom of the whole tag.
Select none.
Open a tube closeup.
Paste as a new layer.
Using your move tool,
position your tube where
you would like it on your tag.

Open a drink element.
Image -Menu tab
Resize 70%.

On your layer palette,
click the paper layer.
Copy and paste the drink
element as a new layer.
Select your move tool.
Move the drink to the left side
of the tag.
Open a cupcake element.
Image menu tab - resize 55%.
Copy and paste as a new layer.
Select your move tool again & move
the cupcake layer to the right
hand side of the tag.
Effects - 3D effects - drop shadow

Opacity 25 Blur 5.00
color Black. Make sure shadow
on new layer is not checked.

Apply the drop shadow to the
tube, cupcake and drink layers.
Merge layers visible.
Go to Layers menu - New
raster layer.

Blend Mode normal
Opacity 100 Link 0
Click Okay.

On your Materials palette, select
the top square with your mouse.
This is the stroke/foreground one.

Click on the square to bring up
the bigger materials square.
Click on the current square to
select a new color.
Click on your tag to choose a
color of choice from it.
Click okay.
Now floodfill the new layer with
the color you just selected.
Go to selections - modify -contract
change the number to 5.
Click okay/apply.
Tap the delete button on your keyboard.
Selections - select none.
On your Materials palette again, this time
choose the bottom of the two squares.
Choose black.
Now choose your font/text tool.

On your text tool options, select an easy
to read font. I am using Arial size 5 but this
may vary on your computer.

Now click on your tag image. You should have a
text box pop up to type out the artist
copyright information in.

To do the copyright symbol ©
Hold down Alt button & press the
numbers 0169 while holding alt.
It may vary on a laptop I'm not sure.
Tags require artist name, url and license
if you are using a PTu artist.
Click okay.
Convert text to raster.
merge layers visible.
-------------------Avatar---------------------------------
To do avatar. Open a new image
size 200x200. Fill with the
color of the top square in the
materials palette.
Click the image with the magic
wand tool.
Copy your tag image.
Paste as a new layer onto your
smaller image.
Use your move tool to position
as wanted on the avatar.
Selections menu - invert
& press delete button on your keyboard.
Move the color layer to above the image layer
in your layer palette.
Click the color layer with your magic wand
tool. Selections menu - modify -expand by 5.
Press delete button on keyboard.
Select your text tool again.
This time you only need the artist name
& license for the copyright. Avatars only
requrie that much due to size.
Convert your text to raster.
Merge layers visible.
Add whatever name you perfer on your
tag sets with a font of choice.
Save both the tag & avatar as png
or jpeg - whichever method you perfer.
Monday, July 30, 2012
My first PTU scrapkit! I designed this one with teaching my little one in mind.
I was teaching him colors and this came to mind. I wanted to do one with that in mind.
You can purchase it at Treasured Scraps.

I was teaching him colors and this came to mind. I wanted to do one with that in mind.
You can purchase it at Treasured Scraps.

Subscribe to:
Posts
(Atom)
Zone Award
