






Showing posts with label Misc. Show all posts
Showing posts with label Misc. Show all posts
Monday, April 9, 2018
CT tag featuring the art of Dean Yeagle
using part of his tube 50-2.
I am also showcasing the fantastic
scrap Forgotten Lane by
It is available in
both Full size & tagger size.
An abandoned street alley has collected
quite an assortment of items over the years.
The local street animals have developed
quite an affection for it as well.


Saturday, April 5, 2014
Two fun CT tags featuring the PTU scrap 80s Play by Amy Marie. This kit celebrates everything 80s and its lots of fun. Bright colors help make the kit pop even more. It is available in her store.


Tuesday, March 18, 2014
Necklace

This tutorial was written
by Sarah Fiack on
March 18,2014
Any resemblance to another
tutorial is purely coincidental.
For this tutorial, I’m using
a tube by Enamorte
You can purchase her tubes at
CDO
No outside supplies are needed.
Plugins: Xero Porcelain
Mura's Meister Copies
dsb flux - blast
Open a 600x250 new image.
Open up your tube of choice as well.
On your materials palette,
for the foreground color,
select a color from your tube.
Hide the background color for now.
Select your ellipse preset shape
tool. Make sure its select to
ellipse and width set to 10.00.
Draw out a shape on your new image.
Position in center of the tag.
Convert to raster.
Adjust - add noise - uniform 45.
Back on your materials palette,
select a dark color for the foreground
& a lighter color for background.
On the foreground, choose gradient -
choose the Foreground -background
gradient.
Angle 90 Repeat 0.
Click inside your preset shape with
your magic wand tool. Selections
modify expand by 3.
Add new raster layer. Fill this layer with the
gradient you made.
Move this layer under the shape layer.
Paste a tube closeup as a new layer
between the two above layers.
Selections invert & press delete.
Select none.
Select your regular tube & copy it.
Paste as a new layer above your bottom
background layer.
Apply the plugin Mura's Meister Copies:
Wallpaper rotate.
Click the bottom layer again.
Selections - select all.
Image - copy to selection.
Duplicate the wallpaper layer.
Select the copy wallpaper layer.
Adjust -blur- motion blur
Angle 90.00 Strength 100
Effect - plugin dsb flux -blast
Direction left Percentage 40%
Effects - edge effects - enhance once.
On the same layer, select your selection tool.
Select a vertical
rectangle anywhere of choice
on the layer. Make sure it goes from
top to bottom. Press delete.
Select none.Repeat across the tag.
I did this a total of 7 times but it
may vary on your tag & rectangles.
Drop shadow the same layer.
2,2,50,5 black.
Go back to the original wallpaper layer.
Adjust blur - gauassian blur 3.00
on the layer.
Apply the plugin Xero Porcelain
default settings.
Merge layers visible.
Apply the plugin AAA Frames Foto
Frames. Default settings but change
width to 5.
Add artist copyright information & name
to the tag. Save as png.
Thanks for trying my tutorial.
Saturday, May 12, 2012

Puzzle Pieces
This tutorial was written
by Sarah Fiack on
May 11, 2012
Any resemblance to another
tutorial is purely coincidental.
For this tutorial, I’m using a
tube by Rene Kunert
The tube is now FTU &
available here.
Supplies:
Tube of choice
Mask SpawnsFSMask57 by Spawns Forum set Masks
Blog
Plugins VM Distortion Tilomat 2000
AAA Frame Foto Frame
Open a 600x250 new image.
Open a tube of choice.
Fill the new image with black
or a dark color.
Paste your tube as a new layer.
Apply the plugin
Muras meister Copies
Wallpaper rotate default settings.
Duplicate the wallpaper layer once.
X out the copy layer.
On the original wallpaper layer,
Adjust blur Gauassian Blur 15
On the same layer, apply the mask
SpawnsFSMask57.
Merge group.
Adjust add noise
Uniform 25 to this layer.
Now unhide the copy layer we hid earlier.
Apply the plugin
VM Distortion Tilomat 2000 default settings.
Take your selection tool, and select various
squares on this layer. You don't want to select
all of them - just certain ones.
Once you have some selected, press delete
on your keyboard.
This should allow you to see the mask layer
underneath as the selected squares should
disappear.
Okay paste your tube as new layer.
You want this the top layer in your layer palette.
Position on the right side of your tag.
Add a drop shadow.
2,2,50,5 Black
Duplicate the tube once & mirror.
On the tube copy layer apply
Effects 3D Effects Cutout
Offset Vertical 10
Horizontal 10
Attributes 50
Blur 5
Colors : two colors from your tag
Hid the tube copy layer.
Merge the rest of the layers visible.
Apply the plugin AAA Frames Foto Frames
Width set to 5.
Unhide the tube copy layer now.
Add words of choice to match
your tag.
I used the words puzzle pieces but
it is entirely up to you.
Convert text to raster.
Add artist copyright info & name.
Merge layers visible.
Save as png.
Thanks for trying my tutorial.
Saturday, May 5, 2012

PSP ADDICT
This tutorial was written
by Sarah Fiack on
May 5th, 2012
Any resemblance to another
tutorial is purely coincidental.
For this tutorial, I’m using
3 tubes by Keith Garvey.
You can purchase the tubes at
his store.
Supplies
Tube of choice.
Scrap of choice.
I’m using one by TK Dezigns
Called Tech Savvy.
It is part of a collab called Tech Savvy.
It is available at PMTwS
Monti Blinds Mask
Here
Plugins: EyeCandy4000 Gradient Glow
Opena 600x600 new image.
Open up your 3 tubes & scrap supplies.
Open a circle frame.
Copy & paste as a new layer.
Click inside the frame with your
magic wand.
Selections modify expand by 8.
Paste a scrap paper of choice as
a new layer.
Selections invert & press delete.
Select none.
Move the paper layer under the frame layer.
Open a ribbon element.
Paste between the two layers.
Resize 85% twice.
Open a computer monitor element.
Resize 80%.
Paste as a new layer.
Open jewel bead element.
Resize 25%.
Paste twice along the top of the monitor
& along the bottom of the element.
This is just to decorate the monitor some.
Click inside the monitor.
Selections expand by 8.
Add a new raster layer.
Fill this layer with a color of choice.
I did grey to make it look like my psp.
Move this layer under the monitor layer.
Open up two of your tubes.
Resize 60% each or as wanted.
Paste them inside the monitor.
Merge the two tube layers together.
Selections invert & press delete.
Select none.
Open a mouse element.
Resize 50% & 80% once each.
Rotate free rotate right 45.
Paste along the right side & slightly
in front of the monitor.
Open two wordarts from the scrap.
Paste one on top of the monitor.
On the 2nd wordart, resize 70%.
Paste along the bottom part of the monitor.
Apply a gradient glow to both wordart layers.
EyeCandy 4000 Gradient glow Fat
Glow width 3.00
Open your main tube.
I mirrored once but this is entirely optional.
Paste along one side of your tag.
Paste a papr of choice on the bottom layer
of the tag.
Apply Monti Blinds Mask.
Make sure invert is checked.
Merge group.
Resize this layer 115%
Merge layers visible.
Resize 88%.
Add artist copyright info & name.
Save as png.
Thanks for trying my tutorials.
Wednesday, February 15, 2012
This one is important to me. With the big anti bullying movement taking place, I thought this would send a good positive message to everyone. Be yourself it is okay. You don't have to be like everyone else.
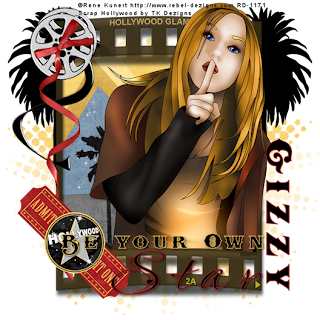
Be Your Own Star
This tutorial was written
by Sarah Fiack on
February 15,2012
Any resemblance to another
tutorial is purely coincidental.
For this tutorial, I’m using a
tube by Rene Kunert
The tube is now FTU &
available here.
Supplies:
Tube of choice
Scrap of choice.
I’m using one by TK Dezigns
Called Hollywood
It is available at Pimp My Tags
with Scraps
Here
Mask:
Kristin TD Mask8 Blog
Open a 600x600 new image.
Open up your tube closeup & scrap supplies.
Open a frame of choice &
paste as a new layer.
Click inside the frame with your
magic wand tool.
Selections modify expand by 3.
Paste a paper of choice as a
new layer.
Selections invert & press delete.
Move the paper layer under the
frame layer.
Paste your tube closeup between the
two layers.
Duplicate the closeup layer once.
Move the copy layer to the top in
your layer palette.
On the original closeup layer, press delete.
Select none.
Now back on the copy layer,
lower the opacity of the layer.
Erase the parts showing past the bottom of
the frame.
This helps give the layer an illusion of coming
out of the frame.
Return the opacity to 100.
Add a drop shadow to original closeup layer.
2,2,50,5 black.
Open a tree element.
Paste on the bottom layer on one side
of the frame. You want the top of the tree
visible. Duplicate once & mirror.
You want to have a tree on each side of
the tag.
Open a film reel element. Resize 70%
Rotate free rotate right 90 or as needed.
Position on the tag on a top corner of the frame.
Open a ribbon element of choice.
Resize 70%
Rotate Free rotate left 90.
Paste on the tag on top of the film reel layer.
Open tickets elements.
Resize 50%
Rotate free rotate right 45.
Paste along a corner of the frame.
Open a record/cd element.
Resize 25%
Paste on the tickets element.
On the bottom layer of the tag,
Paste a paper of choice as a new layer.
Apply the mask KristinTD Mask8.
Merge group.
Merge layers together.
Add wordart or your own saying.
I did a saying of my own.
Add a drop shadow to the text.
Resize everything 88%.
Add copyright info & name.
Save as png.
Thanks so much for trying my tutorial.

Be Your Own Star
This tutorial was written
by Sarah Fiack on
February 15,2012
Any resemblance to another
tutorial is purely coincidental.
For this tutorial, I’m using a
tube by Rene Kunert
The tube is now FTU &
available here.
Supplies:
Tube of choice
Scrap of choice.
I’m using one by TK Dezigns
Called Hollywood
It is available at Pimp My Tags
with Scraps
Here
Mask:
Kristin TD Mask8 Blog
Open a 600x600 new image.
Open up your tube closeup & scrap supplies.
Open a frame of choice &
paste as a new layer.
Click inside the frame with your
magic wand tool.
Selections modify expand by 3.
Paste a paper of choice as a
new layer.
Selections invert & press delete.
Move the paper layer under the
frame layer.
Paste your tube closeup between the
two layers.
Duplicate the closeup layer once.
Move the copy layer to the top in
your layer palette.
On the original closeup layer, press delete.
Select none.
Now back on the copy layer,
lower the opacity of the layer.
Erase the parts showing past the bottom of
the frame.
This helps give the layer an illusion of coming
out of the frame.
Return the opacity to 100.
Add a drop shadow to original closeup layer.
2,2,50,5 black.
Open a tree element.
Paste on the bottom layer on one side
of the frame. You want the top of the tree
visible. Duplicate once & mirror.
You want to have a tree on each side of
the tag.
Open a film reel element. Resize 70%
Rotate free rotate right 90 or as needed.
Position on the tag on a top corner of the frame.
Open a ribbon element of choice.
Resize 70%
Rotate Free rotate left 90.
Paste on the tag on top of the film reel layer.
Open tickets elements.
Resize 50%
Rotate free rotate right 45.
Paste along a corner of the frame.
Open a record/cd element.
Resize 25%
Paste on the tickets element.
On the bottom layer of the tag,
Paste a paper of choice as a new layer.
Apply the mask KristinTD Mask8.
Merge group.
Merge layers together.
Add wordart or your own saying.
I did a saying of my own.
Add a drop shadow to the text.
Resize everything 88%.
Add copyright info & name.
Save as png.
Thanks so much for trying my tutorial.
Subscribe to:
Posts
(Atom)
Zone Award
