


Thursday, October 27, 2016
CT tag featuring the beautiful art of Rebecca Sinz
using her tube Pine. A beautiful lady
surrounded by pine trees. Can't you just
smell the trees now?

Scrap is Moment For Life
CT tag featuring the stunning art of
Barbara Jensen using her tube 84-3 Cosplay.
I am also featuring the
Ladyhawwk Designs Scrap Cutting Edge &
Rebel Dezigns Animation 308 From
Animation Pack 103. She has fully embraced
her love of Cosplay and Sci-fi. If you don't understand
her fandom, than perhaps she isn't the
girl for you. But if you do, then stop by
& say hello.


CT tag featuring the gorgeous
pinup of Justice Howard. I am
using her tube Tempting 2
which is available at
Mystical Scraps. She is beautiful
in her body. It shows how
comfortable she is being bare.
Can you resist wanting to run your
hands along her body?

Wednesday, October 26, 2016

This tutorial was written
by Wicked Cupcake on
October 26,2016
Any resemblance to another
tutorial is purely coincidental.
Open a 700x700 new image.
Select your tube image of choice.
Select your preset Rectangle shape tool.
Make sure to set it to the Square shape option.
On your Materials Palette, hide your Foreground/
Stroke Color Palette box. On the Background/Fill
Choose a dark color from your tube for the color.
Now with the shape tool, draw out a square shape
to the desired size you want for it.
Objects - Align - Center in Canvas. Convert this
layer to raster.
Choose your Ellipse preset shape tool.
Now select the circle shape option on it.
On your Materials Palette, change the
color to white.
Draw out a small circle shape. Convert to raster.
Duplicate this layer four times for a total of five
layers. Arrange around the square as wanted.
Merge the circle layers together.
Select the square layer with your magic wand tool.
Selections - invert.
On the circle layer, press delete on your keyboard.
Select none.
Merge the two shape layers together.
Go to Effects - 3D Effects - Inner Bevel.
Select the Bevel option 3 & click okay.
Paste your tube as a new layer. Arrange on
the shape layer as wanted.
Back on your Materials palette, choose a 3rd
color of choice from your tube for the Background color.
Leave the Foreground color hidden still.
On your Preset shape tool, choose a heart or shape
of choice that fits your tag. I chose to use a heart shape.
Draw out one small heart along your shape layer.
Convert to raster & duplicate once - mirror. Position
this layer as wanted on the tag.
Add a subtle drop shadow the small shape layer we just made.
Select your font tool. Choose a font of choice.
Near the bottom of your tag, click with your mouse
to bring up the text box. Type out a word or two that
fits your tag. I used POLKADOTS for mine.
Once you are happy with the size, convert to raster.
We're going to apply a Gradient Glow to the word now.
Select the plugin EyeCandy4000 Gradient Glow - using
the color setting Fat & Glow width 3.00.
On Materials palette, go back to the earlier dark color that you
used on the square shape.
Now back to the Rectangle shape tool. Draw out a narrow horizontal
rectangle. Convert to raster. You want part of it to stick out from
behind the left side of the word. Duplicate this layer once
& move to the right side as wanted. I did position one near the top &
the other one on the bottom half of word.
Back to our merged shape layer. Duplicate this layer once.
Resize the copy layer 45%. Move this layer to the top left corner
& partially behind the orginal shape layer. You want it coming out from
behind the layer. Duplicate the copy layer once. Move this to the diagonal
right bottom corner. Position so it is coming out on the side of the big layer.
Merge layers visible & crop to desired size.
Add artist copyright information to the tag & save
as a png.
Thanks for trying my tutorial.
CT tag featuring the stunning art of Barbara Jensen
using her bonus tube Heavens Gate.
She is available with a $9.00 purchase
from her store. I have also used the
scrap Color Field by Ladyhawwk Designs.
For her, Heaven is decorated in blues & greens.
Touches of silver help make the colors pop
in her world.


CT tag featuring Art By Barbara Jensen using her tube
84-2 Maria. I am also using the scrap Charity by
Animation 87 from Animation Pack
29 by Rebel Dezigns. Donning her
mask, she flips her skirt and dances away.
The whimsical feel of the night brings
a smile to her face.


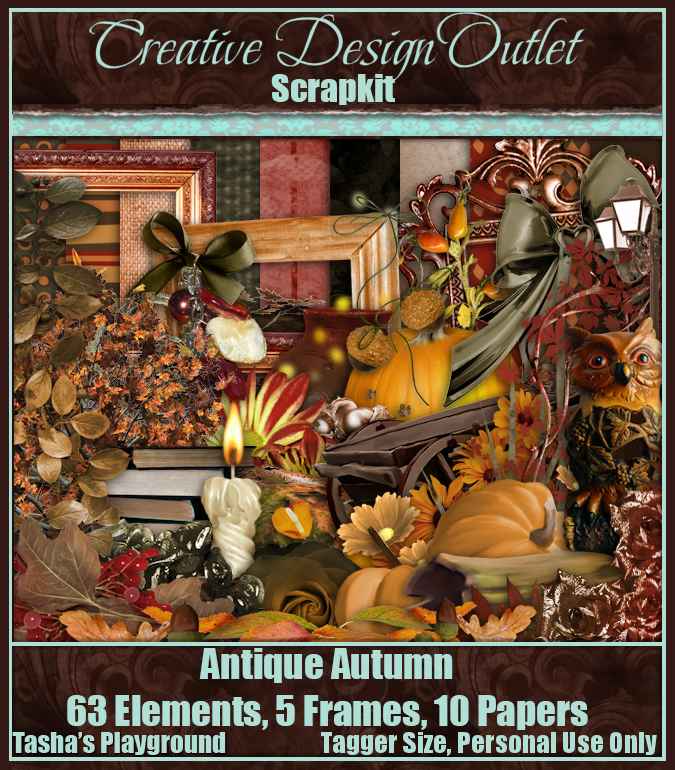
CT tag featuring the gorgeous art of Mélanie Delon
& the wonderful scrap Antique Autumn by
Tasha's Playground. In her quiet corner
of the woods, she decorates with vintage
autumn touches. Like herself, there is
such beauty found in this season. Autumn also
whispers a kind of silence for those allowed to
listen. The silence brings forth a time to reflect
and think of the year which has passed.


Sunday, October 23, 2016
CT tag featuring the magical art of Sara Butcher.
I am using a past bonus tube by her.
With this adorable fairy, I have the
wonderful scrap Home Time by Hungry Hill.
She is getting ready for her day. But first,
a cup of her favorite coffee to wake up.
She loves to sip it on the couch as she
takes a moment to prepare for the day.


CT timeline using the wonderful art of
Charles R. Bristow and his tube
French Maid Desiree.
With her, I am using the scrap
Getting Dirty by Creative
Scraps by Crys. Being in
housekeeping myself as my job,
my own house is definitely NOT clean lol.
I just have no interest in doing it when home.


CT timeline featuring the fantastic art of
Enys Guerrero & the wonderfully gothic
IB Enys Guerrero 21-2 Scrap by
The darkness inside has consumed her.
It seeps out to surround her world entirely.
It seeps out to surround her world entirely.


CT tag featuring the stunning art of
Barbara Jensen using one of her
Holiday Edition tubes. These tubes
come with a few different layers
for holidays. With her, I
have set this witch with the
scrap Creeped by Ladyhawwk Designs.
Both can be found in the store.
She is alluring and creepy at the same time.
A mystery to those who are not
familiar with her kind of magic.


Saturday, October 22, 2016
CT tag featuring the fantastic art of Rebecca Sinz
using her tube Crimson Wings. I am
also using the scrap Crimson Thorns by
Irish Princess Designs with it.
The thorns have bled red and over time,
have turned her wings the same shade.
What has made the thorns bleed remains
a mystery though. Is it a curse as some
suspect - or something more sinister?
The mystery remains - as those who
started it have long passed - buried
in the ancient, gothic church.
have turned her wings the same shade.
What has made the thorns bleed remains
a mystery though. Is it a curse as some
suspect - or something more sinister?
The mystery remains - as those who
started it have long passed - buried
in the ancient, gothic church.


Sunday, October 16, 2016
CT tag featuring the art of Maryline Cazenave
& the wonderful scrap Autumn Days by Honored Scraps.
This adorable raccoon loves everything autumn.
Along with his hedgehog buddy, they collect
all the treasures they find for this time of year.


Friday, October 14, 2016
CT tag featuring the amazing art of Anna Marine
& the spooky scrap Bat-a-licous by
Irish Princess Designs. Will you
brave the night as the bats fly?
Guided by the moonlight, the
creatures of the night have come
out to play.


Tuesday, October 11, 2016
CT tags featuring the beautiful art of Sara Butcher
& scrap by Hungry Hill. For my first tag,
it features the bundle 53. Isn't she just
the sweetest witch with her kitty?
On my 2nd tag, I used the same scrap
but a tube from a different pack by the artist.
I think both help illustrate the magic that
Halloween can cast on everyone.


CT wallpaper featuring the wonderful art of Alena Lazareva
using her October 2016 Bonus tube. With her, i am
also using the festive IB Alena Lazareva October
2016 Bonus Scrap by Hungry Hill. She is
excited for Halloween to come to her
corner of the woods. Lots of trick
or treaters will come decked out in costumes.
Will the ghosts be nice or shall they play tricks?
The wallpaper is available in two sizes
1920x1080 here
1280x1024 here


Monday, October 10, 2016
CT tag featuring the fantastic art of Jasmine Becket-Griffith
& the haunted scrap The Haunting Hour by Tasha's Playground.
This dark angel & her feline companion have waited all
year for this hallowed night. Tonight, they
shall haunt our realm & mingle with
their ghostly friends.


CT tag featuring the wonderful art of PinupToons
& the scrap Autumn Leaves by Gimptastic Scraps.
She reads outdoors among the autumn leaves.
The cool air and autumn colors draw
her outdoors to enjoy her book.


Subscribe to:
Posts
(Atom)
Zone Award
