


Monday, March 5, 2012

Audio Girl
This tutorial was written
by Sarah Fiack on
March 5, 2012
Any resemblance to another
tutorial is purely coincidental.
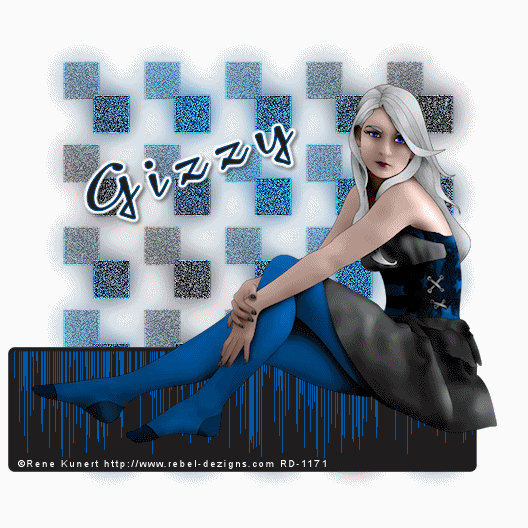
For this tutorial, I’m using a
tube by Rene Kunert
The tube is FTU now &
available here
Supplies:
Tube of choice
Vixmask333
Blog
Animation Shop
Plugins
Filters Unlimited 2.0 Pattern Generators
This tutorial is animated.
Please click here to view the animation.
Open a 600x600 white
new image.
Open up your tube of choice.
Copy & paste your tube
as a new layer. If needed,
resize 88%.
I resized the tube I am using.
Now select your rectangle shape tool.
Width 5 Fill is null & Stroke a dark color
from your tube.
Draw out a nice sized rectangle.
Convert to raster.
Move this layer under your tube.
You want the tube to appear
to be on top of part of the rectangle.
Now take your magic wand &
select inside the shape.
Selections modify expand by 2.
Add a new raster layer.
Fill with a color of choice from tube.
Select none.
Move the layer under the rectangle
frame layer.
On your bottom layer,
add a new raster layer.
Fill with a gradient of your two colors.
I used settings Linear
angle 45 repeats 4
Apply Vixmask333
Merge group.
Duplicate the mask layer once.
On the bottom mask layer,
adjust blur gauassian blur 15.
On the top mask layer,
Effects -edges -enhance
Adjust add noise
uniform 25
Effects -edges -enhance
for a 2nd time.
Resize all layers 88%.
Add copyright information to
your tag.
Now make sure you are on the
fill layer of the rectangle.
Apply the plugin
Filters Unlimited 2.0 Pattern Generators
Default settings.
If you don't wish to animate, then
save your tag at this moment.
To animate please continue.
Copy merged & paste as new animation
into Animation Shop.
Now go back to psp, and undo the plugin.
Select the plugin again & click on randomize once.
Copy merged & paste after current frame.
Repeat this for a total of 4 frames in AS.
Select all frames in AS.
Change your frame properties to 20 or as wanted.
If happy, then save tag.
Thanks so much for trying my tutorial.
Subscribe to:
Post Comments
(Atom)
Zone Award

0 comments:
Post a Comment