






Sunday, October 20, 2013

Harvest Owls
This tutorial was written
by Sarah Fiack on
October 20, 2013
Any resemblance to another
tutorial is purely coincidental.
I am using 1 tube by Lisa Victoria
which you can purchase at
Up Your Art
I am also using the scrap Sweet Harvest
by Amy Marie which you can purchase
at here.
Mask by Moonbeams & Spiderwebs
MB and SW Mask26
Blog
Open a new image 700x700.
Open up your tube and scrap
supplies.
Copy and paste your tube
as a new layer onto your image.
Open a scattered leaf element.
Paste as a new layer.
Move this layer below your tube layer
in your layer palette. Move over to the side
and near the bottom of your tube.
Duplicate the leaf layer once & mirror.
Open a grass element.
Repeat the above steps with it but make
sure the 2 grass layers are underneath
the scattered leaf layers.
Add a drop shadow to your main
tube layer.
2,2,50,5 black.
Also add a drop shadow to the leaf layers
as well.
Open a flower element.Resize 50%.
Paste as a new layer at the base of
one side of your tube. I used the flowers
to hide the end of the branch for the tube
I chose.
Open a tree element. Mirror once.
Paste as a new layer above the scattered
leaves layer. Position on the same side
of the flower.
Open a squirrell element. Resize 50%.
Paste beside the flower element on your tag.
Open a haybale element.
Paste below the previous layers behind
your main tube on one side.
Duplicate once & mirror.
Open a wooden sign.
Resize 45%.
Paste on the right side in front
of the tag. Position so it appears
to be standing in the grass/leaves.
Open a wordart of choice. I am using
one provided in the scrap I chose.
Resize 60% or as needed.
Paste as a new layer.
Position below your tube on tag -
but you do want it as a top layer.
Add the earlier drop shadow to the wordart.
Open a leaf heart element.
Paste as a new layer & position behind
your main tube.
Choose a scrap paper of choice.
Paste as a new layer making sure it is
below the other previous layers.
Layers - Load mask.
MB and SW Mask26
Merge group.
Still on the mask layer.
Adjust - blur- Gauassian Blur 3.00
Merge layers visible.
Crop to desired size.
Add artist copyright information and name.
Save as png.
Thanks for trying my tutorial.
Wednesday, October 16, 2013
My Ladybug
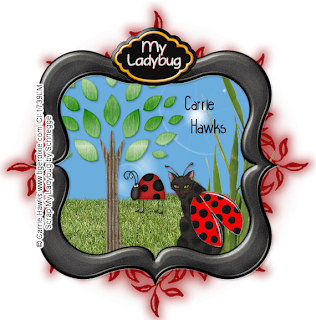
This tutorial was written
by Sarah Fiack on
October 16, 2013
Any resemblance to another
tutorial is purely coincidental.
I am using a tube by Carrie Hawks
which you can purchase at
CDO
I am also using My Ladybug scrap by
Schnegge which can also be purchased
at CDO.
Tresemask0033
which you can find here
Open a 700x700 new image.
Open up a tube and scrap
supplies.
Choose a frame of choice
from your scrap. Copy and paste
as a new layer.
Click inside your frame with your
magic wand tool.
Selections modify expand by 10.
Paste a paper of choice as a
new layer. Selections - invert
& press delete button.
For the one I used,
I opened a new 700x700 image.
I floodfilled with blue for the sky.I
copied onto the tag image. But you can
use any paper you want.
Select the picture tube tool in your PSP.
We are going to use the grass which
comes with it.
Add a new layer above the paper layer.
Click on your tag as needed to get
the grass as you want it.
You want to give the look of ground
with the grass.
Once done, press delete.
Open a tree element.
Resize 75%.
Paste between the paper
& frame layer.
Press delete.
Select none.
Open standing grass element.
Resize 75% & mirror.
Paste on the side across from
the tree.
Open your main tube.
Resize 40%.
Position on the grass beside
the tree element.
Open white glowing orbs/clouds.
Resize 45%. Paste along the paper.
These can serve as clouds in our sky.
Open a ladybug element.
Resize 25%.
Paste on the grass beside the tree
element.
Add a drop shadow to the layers
frame,tree,ladybug, and tube.
Open a wordart plaque. I am using
one provided in the scrap.
Resize 40%.
Paste at the top of the frame.
Paste a 2nd paper of choice
as a new layer. Move this layer
below all the previous tag layers.
Apply the mask Tresemask0033.
Merge group.
Resize this layer 95%.
Merge layers visible.
Crop your tag to desired size.
Add artist copyright information
and name.
Save as png.
Thanks for trying my tutorial.

This tutorial was written
by Sarah Fiack on
October 16, 2013
Any resemblance to another
tutorial is purely coincidental.
I am using a tube by Carrie Hawks
which you can purchase at
CDO
I am also using My Ladybug scrap by
Schnegge which can also be purchased
at CDO.
Tresemask0033
which you can find here
Open a 700x700 new image.
Open up a tube and scrap
supplies.
Choose a frame of choice
from your scrap. Copy and paste
as a new layer.
Click inside your frame with your
magic wand tool.
Selections modify expand by 10.
Paste a paper of choice as a
new layer. Selections - invert
& press delete button.
For the one I used,
I opened a new 700x700 image.
I floodfilled with blue for the sky.I
copied onto the tag image. But you can
use any paper you want.
Select the picture tube tool in your PSP.
We are going to use the grass which
comes with it.
Add a new layer above the paper layer.
Click on your tag as needed to get
the grass as you want it.
You want to give the look of ground
with the grass.
Once done, press delete.
Open a tree element.
Resize 75%.
Paste between the paper
& frame layer.
Press delete.
Select none.
Open standing grass element.
Resize 75% & mirror.
Paste on the side across from
the tree.
Open your main tube.
Resize 40%.
Position on the grass beside
the tree element.
Open white glowing orbs/clouds.
Resize 45%. Paste along the paper.
These can serve as clouds in our sky.
Open a ladybug element.
Resize 25%.
Paste on the grass beside the tree
element.
Add a drop shadow to the layers
frame,tree,ladybug, and tube.
Open a wordart plaque. I am using
one provided in the scrap.
Resize 40%.
Paste at the top of the frame.
Paste a 2nd paper of choice
as a new layer. Move this layer
below all the previous tag layers.
Apply the mask Tresemask0033.
Merge group.
Resize this layer 95%.
Merge layers visible.
Crop your tag to desired size.
Add artist copyright information
and name.
Save as png.
Thanks for trying my tutorial.
Tuesday, October 15, 2013
Lavendar Sweetheart

This tutorial was written
by Sarah Fiack on
October 15,2013
Any resemblance to another
tutorial is purely coincidental.
For this tutorial, I’m using
a tube by Camilla Drakenborg
You can purchase her tubes at
UYA
Supplies:
Tube of choice
Scrap of choice.
I am using one called Chell by
Amy Marie. It is also available
at her store.
Mask
Tresemask 0002
Open a 700x700 new image.
Open up your tube & scrap supplies.
Choose a frame of choice.
I am using a circle frame.
Paste the frame as a new layer.
Click inside the frame with
your magic wand tool.
Selections -modify-expand by 15.
This can vary depending on the
frame you select to use.
Select a scrap paper of choice.
Paste as a new layer.
Selections invert & press delete
button.
Move the paper underneath the
frame layer.
Keep selected.
Above the paper layer, paste
a heart doodle element from
the scrap.
Press delete.
Paste your tube as a new layer.
Position in one side of the frame.
Press delete.
Select none.
Add a drop shadow to the
frame, tube & doodle layers.
2,2,50,5 black.
Open a color splatter element.
Paste as a new layer & move this
layer underneath the previous layers
in your layer palette. You want it
coming out from behind the
frame layers.
Open a horizontal leaf branch.
Paste on the left side above the
splatter layer. Duplicate once & mirror.
This way you see parts of the branch
from both sides of the tag.
Open a vertical branch.
Paste above the horiztonal branch
on the left side. You want the leaves
to be coming up.
Open a flower element of choice.
Resize 50% or as needed.
Paste as a new layer at the top
of the frame.
Open a horizontal ribbon.
Resize 60% or as needed.
Paste along the bottom of
the frame.
Open a martini glass element.
Resize 60%.
Paste as a new layer on the left side
- position this layer behind the ribbon
layer.
Add the earlier drop shadow to the
glass element.
Open a flower layer.Resize 40%.
Paste on the right hand end
of the ribbon.
Open a key element.
Resize 50%. Paste on the
right hand side behind the
flower and ribbon layers.
Add the earlier drop shadow to it.
Open a butterfly element.
Resize 40%.
Paste along the frame &
vertical leaf branch element.
Paste a scrap paper of choice as
a new layer below the previous layers.
Apply the mask Tresemask 0002.
Merge group.
Merge layers.
Add artist copyright information
and name to the tag.
Save as png.
Thanks for trying my tutorial.

This tutorial was written
by Sarah Fiack on
October 15,2013
Any resemblance to another
tutorial is purely coincidental.
For this tutorial, I’m using
a tube by Camilla Drakenborg
You can purchase her tubes at
UYA
Supplies:
Tube of choice
Scrap of choice.
I am using one called Chell by
Amy Marie. It is also available
at her store.
Mask
Tresemask 0002
Open a 700x700 new image.
Open up your tube & scrap supplies.
Choose a frame of choice.
I am using a circle frame.
Paste the frame as a new layer.
Click inside the frame with
your magic wand tool.
Selections -modify-expand by 15.
This can vary depending on the
frame you select to use.
Select a scrap paper of choice.
Paste as a new layer.
Selections invert & press delete
button.
Move the paper underneath the
frame layer.
Keep selected.
Above the paper layer, paste
a heart doodle element from
the scrap.
Press delete.
Paste your tube as a new layer.
Position in one side of the frame.
Press delete.
Select none.
Add a drop shadow to the
frame, tube & doodle layers.
2,2,50,5 black.
Open a color splatter element.
Paste as a new layer & move this
layer underneath the previous layers
in your layer palette. You want it
coming out from behind the
frame layers.
Open a horizontal leaf branch.
Paste on the left side above the
splatter layer. Duplicate once & mirror.
This way you see parts of the branch
from both sides of the tag.
Open a vertical branch.
Paste above the horiztonal branch
on the left side. You want the leaves
to be coming up.
Open a flower element of choice.
Resize 50% or as needed.
Paste as a new layer at the top
of the frame.
Open a horizontal ribbon.
Resize 60% or as needed.
Paste along the bottom of
the frame.
Open a martini glass element.
Resize 60%.
Paste as a new layer on the left side
- position this layer behind the ribbon
layer.
Add the earlier drop shadow to the
glass element.
Open a flower layer.Resize 40%.
Paste on the right hand end
of the ribbon.
Open a key element.
Resize 50%. Paste on the
right hand side behind the
flower and ribbon layers.
Add the earlier drop shadow to it.
Open a butterfly element.
Resize 40%.
Paste along the frame &
vertical leaf branch element.
Paste a scrap paper of choice as
a new layer below the previous layers.
Apply the mask Tresemask 0002.
Merge group.
Merge layers.
Add artist copyright information
and name to the tag.
Save as png.
Thanks for trying my tutorial.
Monday, October 14, 2013

With Love Elegance
This tutorial was written
by Sarah Fiack on
October 14,2013
Any resemblance to another
tutorial is purely coincidental.
I am using an Exclusive tube by Barbara
Jensen which you can purchase at
CDO
I am also using the scrap Forever
by Babycakes Scraps which you can also
purchase at CDO
Mask Tresemask0028 by Trese tags
Blog
Open a 700x700 new image.
Open up your tube and scrap supplies.
Select a frame of choice.
Resize 80% or as needed.
Paste as a new layer onto your image.
Click inside the frame with your
magic wand tool. Selections modify
expand by 2.
Paste your paper of choice as
a new layer.
Selections invert & press delete button.
Move the paper underneath the
frame layer.
Select none.
Paste your tube as a new layer
above the frame layer.Resize the
tube layer 90%.
Open a vertical frame.
Resize 50%.
Position on the upper left
side of the 1st frame.
Click inside the opening of the frame with
your magic wand tool.
Selections modify expand by 2.
Paste a paper of choice as a new layer.
Move the paper layer underneath the frame.
Copy merged your tube & paste as
a new layer. Press delete.
Select none.
On the tube layer, change the blend mode
to soft light on your layer palette.
Add a drop shadow to the tube &
frame layers. 2,2,50,5 black.
Open a leaf branch. Flip it once.
Paste behind your tube layer.
Add the above drop shadow to this layer.
Open two flower elements.
Resize 1st flower 50%.
Paste behind your tube on the
left side.
On the 2nd flower, resize 70%.
Rotate -free rotate Left 45.00. Position this one
by the 1st flower.You want them to appear to
be coming out from behind your tube.
Duplicate the 1st flower and move to the
other side of the 2nd flower.
Merge the flower layers together.
Add the earlier drop shadow to the layer.
Open a heart doodle element.
Resize 70%. Paste behind your
main tube on the right side.
Paste a scrap paper below the previous layers.
Apply the mask Tresemask0028.
Merge group.
Resize the mask 94%.
Select a wordart of choice. I am
using one which came in the scrap I chose.
Paste at the bottom of the tag.
Merge layers.
Crop to desired size.
Add copyright information & name.
Save as png.
Thanks for trying my tutorial.
Wednesday, October 9, 2013

Made With Love
This tutorial was written
by Sarah Fiack on
October 9th, 2013
Any resemblance to another
tutorial is purely coincidental.
I am using a tube by Sabine Rich .
This tube is available at
CDO
I am also using the PTU scrap Cutie Pie by WDDesignz
which can also be purchased at CDO.
MC_Mask14 by Melissaz Creationz
Blog
Plugins:
Mura's Meister Copies
Xero Porcelain
Open a 700x700 new image.
Open up your tube and scrap supplies.
Choose two frames. Paste the first
one as a new layer. Click inside the
first frame with your magic wand tool.
Selections modify expand by 5.
Paste a paper of choice as a new layer.
Selections invert & press delete.
Move the paper underneath the frame layer.
Now open a new 700x700. Choose your font
tool. Select a simple font and a low number size.
Type out in caps a single word of choice.
Convert to raster.
Apply the plugin Mura's Meister Copies
Tiling - change the tile gap to 2.
Copy & paste above the paper layer.
Press delete & select none.
Set the blend mode on this layer to Overlay.
Open a leaf element. Position underneath
the side of the frame layers - but peeking out
on the side of it. Duplicate once & mirror.
Resize the 2nd frame
at 70%. Paste on the right side
of the first frame.
Click inside the frame with first frame with your magic wand tool.
Selections modify expand by 5.
Paste a 2nd paper of choice as a new layer.
Selections invert & press delete.
Move the paper underneath the frame layer.
Paste your tube between the two layers.
Press delete. Select none. Merge the tube
and paper layers together.
Apply the Xero Porcelain plugin
Softness 97 Strength & Brightness 128
Add a drop shadow to the 2nd frame.
2,2,25,5 Black
Open a teddy bear element.
Resize 40%. Paste at the bottom
of the 2nd frame layers.
Open a heart doodle. Mirror.
Paste as a new layer above the
layer of the 1st frame. Add the
earlier drop shadow.
Paste your tube as a new layer.
Position by the left side of
the 2nd frame.
Open a silver button element.
Resize 40%.
Paste on the two right hand corners
of the 2nd frame.
Paste a paper of choice as a new layer
below the previous layers. Apply the mask
MC_Mask14
Merge group.
Merge layers together. Apply the Xero Porcelain plugin
Softness 97 Strength & Brightness 128
Resize if needed or wanted.
Add artist information & name.
For the name on my tag, I did adjust add noise
uniform 25 - but that is optional.
Save as png.
Thanks for trying my tutorial.
I created these snags using the artwork of Anna Marine and a matching Inspired by Scrapkit
by WDDesignz. You can find both at CDO.


by WDDesignz. You can find both at CDO.


Friday, September 27, 2013
Elegant Beauty

This tutorial was written
by Sarah Fiack on
Sept 27th, 2013
Any resemblance to another
tutorial is purely coincidental.
I am using a tube by The Vintage Angel™
This tube is available at
CDO
I am also using Elegant Beauty
scrap by WDDesignz which can also be purchased
at CDO.
Animation 227
by Simone Scrappy Bit Of Fun
here
Open a 700x700 new image with
a white background.
Open up your tube and scrap
supplies.
Choose two frames -
1 horizontal and 1 vertical.
Copy & paste the horizontal
frame first.
Click inside the frame with your
magic wand. Selections modify
expand by 5. Paste a paper of choice
as a new layer. Selections invert
& press delete button. Select none.
Move the paper underneath the frame.
Now copy and paste the vertical frame.
You want it on top & in center of the
previous frame. Click inside the frame
with your magic wand. Selections modify
expand by 5. Paste a 2nd paper of choice
as a new layer. Selections invert
& press delete button. Select none.
Move the paper underneath the frame.
Keep selected.
Paste your tube of choice as a new
layer between the two layers of the vertical
frame. Duplicate the tube once. Move the
copy layer to above the vertical frame layer.
Back on the original tube, press delete.
Select none.
On the copy tube layer,erase parts
showing past the frame which you
do not want to show.
Add a drop shadow to the frame layers
and the original tube layer.
2,2,50,5 black.
Open a clock element.
Resize 70%. Position above the
1st frame on the left side of the tag.
You want it to appear to be coming out
from behind the top frame layers.
Open a ribbon key element. Resize 70%.
Paste as a new layer. Position on your tag
across from the clock - opposite side.
Add the above drop shadow to this layer.
Open a scattered flower element.
Resize 80%. Paste along the top layer on
the bottom of the tag. My element comes up
on the right side of the tag .Add the earlier drop
shadow to the layer.
Open a corner netting element. Copy and paste
on a bottom corner of the tag ( left or right side ).
Duplicate the layer once - Mirror & flip the copy layer.
Open a wordart of choice. Resize 70%
Paste as a new layer. Position near the bottom
of the tag on the top layer.
Add a drop shadow to the layer.
Open a necklace element. Move underneath
the top frame layers. You want the charm
to appear on the bottom of your tag -
out from underneath the frame layers.
Open a vertical branch. Resize 70%. Paste on the right side of the
tag above the net layer. You want it to come up at the top of the tag.
Merge the layers visible except
for the white background.
Duplicate the merged layers once.
On the bottom layer, adjust blur
Gauassian blur 3.00
Crop to desired size.
Add artist copyright information
& name to the tag.
If you are not animating,
you can save the tag here &
will not need a white background on it.
If you are animating, continue and merge visible.
In Animation shop, open animation of choice.
I changed the color of the animation I am using.
To do this, click on your animation -
Edit select all. Animation - replace a color.
Select the color you are replacing in the animation. On the 2nd box,
choose a color from your tag
to replace the color.Tolerance is 20.
Copy your tag as copy merged. Now go to Animation shop
and paste as a new animation.
Duplicate for the required number of frames
as your animation has.
For the animation I am using, it has 16
frames. This means I have to duplicate
the tag image for a total of 16 frames.
To duplicate, hold down Ctrl and repeatedly
press the L button.
Down on the bottom right corner of AS,
it will show how many frames you have.
Once you have all the frames needed,
edit - select all.
Now on your animation, select all - copy.
Drag onto your tag image.
Select all - view animation.
If happy, save as gif.

This tutorial was written
by Sarah Fiack on
Sept 27th, 2013
Any resemblance to another
tutorial is purely coincidental.
I am using a tube by The Vintage Angel™
This tube is available at
CDO
I am also using Elegant Beauty
scrap by WDDesignz which can also be purchased
at CDO.
Animation 227
by Simone Scrappy Bit Of Fun
here
Open a 700x700 new image with
a white background.
Open up your tube and scrap
supplies.
Choose two frames -
1 horizontal and 1 vertical.
Copy & paste the horizontal
frame first.
Click inside the frame with your
magic wand. Selections modify
expand by 5. Paste a paper of choice
as a new layer. Selections invert
& press delete button. Select none.
Move the paper underneath the frame.
Now copy and paste the vertical frame.
You want it on top & in center of the
previous frame. Click inside the frame
with your magic wand. Selections modify
expand by 5. Paste a 2nd paper of choice
as a new layer. Selections invert
& press delete button. Select none.
Move the paper underneath the frame.
Keep selected.
Paste your tube of choice as a new
layer between the two layers of the vertical
frame. Duplicate the tube once. Move the
copy layer to above the vertical frame layer.
Back on the original tube, press delete.
Select none.
On the copy tube layer,erase parts
showing past the frame which you
do not want to show.
Add a drop shadow to the frame layers
and the original tube layer.
2,2,50,5 black.
Open a clock element.
Resize 70%. Position above the
1st frame on the left side of the tag.
You want it to appear to be coming out
from behind the top frame layers.
Open a ribbon key element. Resize 70%.
Paste as a new layer. Position on your tag
across from the clock - opposite side.
Add the above drop shadow to this layer.
Open a scattered flower element.
Resize 80%. Paste along the top layer on
the bottom of the tag. My element comes up
on the right side of the tag .Add the earlier drop
shadow to the layer.
Open a corner netting element. Copy and paste
on a bottom corner of the tag ( left or right side ).
Duplicate the layer once - Mirror & flip the copy layer.
Open a wordart of choice. Resize 70%
Paste as a new layer. Position near the bottom
of the tag on the top layer.
Add a drop shadow to the layer.
Open a necklace element. Move underneath
the top frame layers. You want the charm
to appear on the bottom of your tag -
out from underneath the frame layers.
Open a vertical branch. Resize 70%. Paste on the right side of the
tag above the net layer. You want it to come up at the top of the tag.
Merge the layers visible except
for the white background.
Duplicate the merged layers once.
On the bottom layer, adjust blur
Gauassian blur 3.00
Crop to desired size.
Add artist copyright information
& name to the tag.
If you are not animating,
you can save the tag here &
will not need a white background on it.
If you are animating, continue and merge visible.
In Animation shop, open animation of choice.
I changed the color of the animation I am using.
To do this, click on your animation -
Edit select all. Animation - replace a color.
Select the color you are replacing in the animation. On the 2nd box,
choose a color from your tag
to replace the color.Tolerance is 20.
Copy your tag as copy merged. Now go to Animation shop
and paste as a new animation.
Duplicate for the required number of frames
as your animation has.
For the animation I am using, it has 16
frames. This means I have to duplicate
the tag image for a total of 16 frames.
To duplicate, hold down Ctrl and repeatedly
press the L button.
Down on the bottom right corner of AS,
it will show how many frames you have.
Once you have all the frames needed,
edit - select all.
Now on your animation, select all - copy.
Drag onto your tag image.
Select all - view animation.
If happy, save as gif.
Subscribe to:
Posts
(Atom)
Zone Award
