


Sunday, March 31, 2013
with scraps by BLT DeZignZ. Be sure to check out her wonderful scraps!
April Showers Cluster
Download Here

Escape From The Zoo Cluster
Download Here

Slumber Party Cluster
Download Here

April Showers Cluster
Download Here

Escape From The Zoo Cluster
Download Here

Slumber Party Cluster
Download Here

Thursday, March 28, 2013

Splash Flowers
This tutorial was written
by Sarah Fiack on
March 28,2013
Any resemblance to another
tutorial is purely coincidental.
For this tutorial, I’m using a tube
by Mashi. You can purchase it
at CDO.
Plugins:
Mura's Meister Copies
VM Natural Splash
Mask MB & SW Mask 32
Moonbeams & Spiderwebs Blog
Open a 600x600 new image.
Copy & paste your tube as a new layer.
Choose your rectangle preset shape tool.
On your materials palette, choose a light
color from your tube for Foreground color.
Choose a darker color for your background
color.
Preset shape setting:
width 5.00
Draw out a rectangle similar
in size to your main tube.
Convert to raster.
Move below the tube layer &
behind it.
Duplicate the tube once.
On the original tube, apply
Mura's Meister Copies
Wallpaper rotate default settings.
Select the rectangle layer with your
magic wand. Now back on the wallpaper layer,
selections invert & press delete key on keyboard.
Select none.
Duplicate this layer.
On the top wallpaper layer, apply the plugin
VM Natural Splash default settings
Change the blend mode on this layer to
Hard Light.This allows the original wallpaper
layer to be visible some & still see the splash effect.
On your main tube, resize 88% if needed.
Also add a drop shadow of choice to the tube.
Add a new raster layer below the tag layers.
Fill with a color of choice from your tag.
Apply the mask MB & SW Mask 32
Merge group.
Add text of choice along the bottom of your tag.
I used the words Splash Flowers.
Crop your tag to desired size.
Add artist copyright & name.
Save as png.
Thanks for trying my tutorial.
Wednesday, March 27, 2013


Friday, March 22, 2013
I made a wordart out of a new quote by me. Was laying down last night snuggled up to my youngest
and thought of this. Wanted to share it. The quote is " Children are a masterpiece and we are the artists lucky enough to help create and discover them." As parents, we defintely help shape and create our children..and they are masterpieces for sure - true works of art in the human beings that they become.
It is our artist brushes that help determine what kind of person/masterpiece that they become.
Download Here

Thursday, March 21, 2013
Featuring a soon to be released tube called Amber by Roman Zaric. She will be available in his
store.


store.


Friday, March 15, 2013
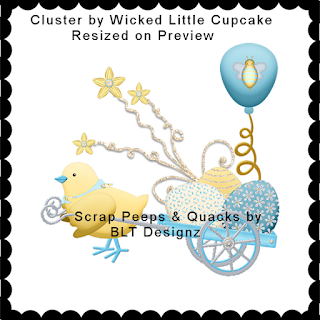
An adorable new cluster from the scrap Peeps & Quacks by BLT DeZignZ. The scrap is equally adorable!
Download Here
Download Here

Features a new scrap by BLT DeZignZ called Cleaning Day. Such a great kit!
You can download the cluster
Download Here

You can download the cluster
Download Here

I've been lucky to join the CT for BLT DeZignZ scraps. She has some really wonderful scraps. I'll be doing clusters with the scraps. Maybe cluster frames maybe just clusters - it varies on the scrap & how my muse works lol
This one is from her new kit called 3 Ring Circus.
Download Here

This one is from her new kit called 3 Ring Circus.
Download Here

Thursday, March 14, 2013
I wanted to share some of the tags I've done with this wonderful artist. I love her tubes. It's such a classy old world fairy feel to them. I have fallen in love with them! They also pair nicely with my photos! You can find the tubes and my photo packs at PSP TUBE STOP.


This one is of a current bonus tube at Arthur Crowe's store. I absolutely love Alice In Wonderland!
And that these have a little more attitude and grungy look to them also. The scrap is a matching
kit which comes with the tube.

And that these have a little more attitude and grungy look to them also. The scrap is a matching
kit which comes with the tube.

Subscribe to:
Posts
(Atom)
Zone Award
