






Saturday, December 7, 2013

Friday, December 6, 2013
Christmas snags using art by Amy Brown and PTU scrap
O Christmas Tree by Honored Scraps. Both can be found
at CDO.


O Christmas Tree by Honored Scraps. Both can be found
at CDO.


Thursday, December 5, 2013

This tutorial was written
by Sarah Fiack on
November 23, 2013
Any resemblance to another
tutorial is purely coincidental.
I am using a tube by Anthony Guerra.
I purchased this tube at Cilm when it was
open. Also this artist is no longer
selling tubes.
I am also using Holiday Memories 2
scrap by Amy Marie which can also be purchased at her
store.
Melissaz Creationz mask
MC_Mask3
Here
Open a 700x700 new image.
Open up a tube and scrap supplies.
Open up a necklace element
which is laying down.
Apply Image - Free rotate -
Left 45.00.
Click inside the necklace
element with your magic wand.
Selections - modify -expand
by 3.00.
Paste a paper of choice as
a new layer.Selections -invert
& press delete button on keyboard.
Move the paper layer underneth
the necklace layer.
Paste your tube as a new layer
between the two layers.
Duplicate once. Move the tube copy
layer above the necklace layer.
Hide for now.
Back on the original tube layer,
press delete.
Select none.
Unhide the tube copy layer.
Using your eraser tool,Erase
parts which you don't want shown.
You want the tube to appear to
come out from within the necklace.
Open a leaf corner element.
Paste as a new layer.Arrange in
your layer palette,underneth the
3 necklace layers.
Duplicate the leaf corner once.
Mirror & flip the leaf copy layer.
You want to arrange the two
leaf corners so they frame
the necklace on either side.
Open an element of hanging balls.
Resize 80%.
Position on the right side of your
tag.Move the layer underneth the
necklace layers - and above the
leaf corner layer.
Open a scattered frame.
Paste as a new layer below the
previous layers.
Paste a paper of choice above
the bottom layer of the tag.
Apply the mask MC_Mask3.
Merge group.
Open a deer element.
Mirror once.
Paste as a new layer.
Position this layer in your layer
palette, behind the necklace layers.
You want the deer coming out on
the left side of the tag.
Add a drop shadow to the following
layers. 2,2,50,5 black.
Deer,necklace, original tube layer.
Open a cup saucer element.
Resize 40% and 75% once each.
Paste on the bottom right hand
corner of the tag.
Merge layers visible.
Crop to desired size.
Add artist copyright information
and name.
Save as png.
Thanks for trying my tutorial.

This tutorial was written
by Sarah Fiack on
December 5th, 2013
Any resemblance to another
tutorial is purely coincidental.
I am using 1 tube by Anna Marine.
This tube is available at
CDO
I am also using the PTU scrap Mythic
by Hungry Hill which is also available
at CDO.
Moonbeams & Spiderwebs Mask
MB and SW Mask 19 which you can find
Here
Open a 700x700 new image.
Open up your tube and scrap
supplies.
Open a doodle element.
Resize 70%.
Paste as a new layer onto your tag.
Open a leaf branch. Resize 80%
Paste below your doodle layer.
Take your eraser tool & erase
part of the branch sticking out
at the bottom.
Open a flower bead cluster element.
Resize 60%.
Paste as a new layer at the bottom of
the doodle & branch.
Copy and paste your tube as
a new layer onto your tag.
Move your tube layer to below
the previous layers except for the
leaf branch element.
You want that one below the tube layer.
Open a 2nd branch element.
Resize 60%. Paste as new layer
above the 1st branch layer. I chose a branch
that goes behind my tube directionwise.
Drop shadow your tube, cluster and doodle layers.
2,2,50,5 black.
Open a castle tower element.
Resize 50%.
Paste on the bottom layer of the tag.
Position so it appears behind the layers
and your tube.
Open a squireel or animal element.
Resize 25%.Paste as a new layer
as a top layer on your tag.
Position down at the bottom.
Add the above drop as well to it.
Open a shurb element.
Resize 50%.
Paste near the bottom of the
tag. Move this layer to in front
of the castle tower but keep
near the bottom of the tag still.
Duplicate once. Move this layer
so the shrubs are side by side.
You want the shrubs peeking
out on either side of the tag.
Open a deer element.
Resize 50%.Position on the right side
of the tag. You want the deer layer
on a layer above the shrub layers.
Have the deer appear
to be coming out of the plants
and on or over the shrub.
Also drop shadow the deer layer
as well.
Choose your font tool & a font of
choice to fit your tag.
On your Materials palette,
choose two colors from your tag.
On your tool options, set stroke to 1.0
Type out text of choice.
I used " Tower Walk."
But you can change it for your tag.
Convert to raster once you are
happy with the text and size.
Add the earlier drop shadow to the
text layer as well.
Paste a paper of choice as a
new layer - making sure it is
the bottom layer of the tag.
Apply the mask MB and SW Mask 19.
Merge group.
Merge layers visible.
Crop to desired size.
Add artist copyright information & tag name.
Save as png.
Thanks for trying my tutorial.
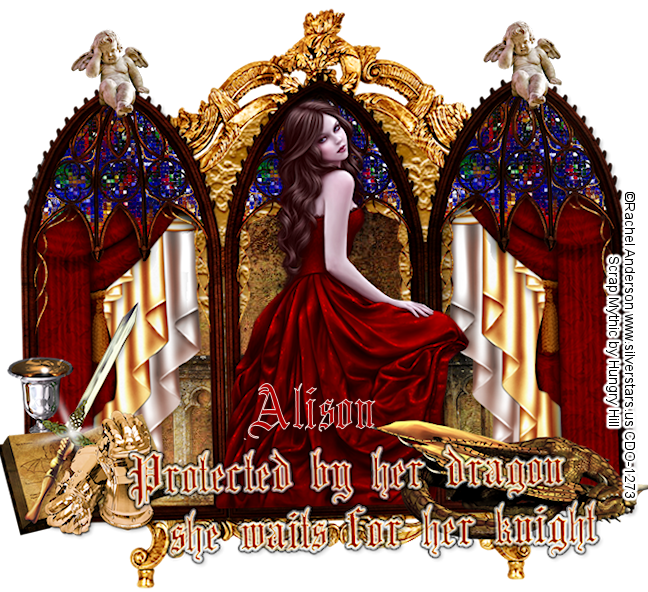
This tutorial was written
by Sarah Fiack on
December 5th, 2013
Any resemblance to another
tutorial is purely coincidental.
I am using 1 tube by Rachel Anderson
This tube is available at CDO
I am also using the PTU scrap Mythic
by Hungry Hill which is also available
at CDO.
Plugin
EyeCandy 4000 Gradient glow
Open a 700x700 new image.
Open up your tube and scrap
supplies.
Open a multi section frame.
Resize 80%.
Copy and paste as a new layer.
Select your magic wand.
Hold shift button down &
select the various empty
sections inside your frame.
Once you have them all selected,
selections - modify -expand by 2.
Paste a paper of choice as a new layer.
Selections invert & press delete button.
Move the paper underneth the frame layer.
Keep selected.
Open a balcony element.
Resize 80%. Paste as a new layer
between the paper & frame layers.
Position in the bottom half of the
frame.
Press delete and select none.
Add a drop shadow to the balcony
element and frame layers.
2,2,25,5 black.
Open up your tube of choice.
Resize 80%.Position on the center
of your frame - making sure the tube is
the layer above the frame layer in your
layer palette.
Open a sword element.
Resize 45% and 70% once each.
Paste as a new layer & position on
the bottom left corner of the frame.
Add a drop shadow to the layer.
Open a book element.
Resize 25%. Position as a new layer
behind the sword element.
You want to see the book
behind the sword.
Open a square frame.
Resize 80% or as needed.
Paste on the bottom layer
of the tag.
Click inside the frame with
your magic wand.
Selections - modify -expand
by 3.
Paste a paper of choice
as a new layer.
Selections invert - press delete.
Move this layer underneth the
frame layer.
Open an angel statue element.
Resize 25% & 50% once each.
Paste on the left & right sides
of the frames. You want them on
the tops of the frames.
Open a dragon element.
Resize 50% and 80% once each.
Position on the tag on the bottom
right corner.
Open a goblet element.
Resize 25% and 75% once each.
Position on the tag behind ( underneth in
layer palette ) the book and sword.
You want the top part of the goblet visible
though.
Choose your font tool & a font of
choice to fit your tag.
On your Materials palette,
choose two colors from your tag.
On your tool options, set stroke to 1.0
Type out text of choice.
I used " Protected by her dragon
she waits for her knight."
But you can change it for your tag.
Convert to raster once you are
happy with the text and size.
Effects - 3D effects - inner bevel.
Apply bevel 2 default settings.
Apply the plugin EyeCandy 4000 Gradient glow
Default glow which first shows up.
Glow width 3.00 - change color to one from tag.
Apply. Now go back to gradient glow.
This time apply the glow setting black halo.
Apply the earlier drop shadow as well.
Merge layers visible. Crop to desired size.
Add artist copyright information & name for tag.
Save as png.
Thanks for trying my tutorial.
Tuesday, December 3, 2013


Monday, December 2, 2013
Movie Snacks

This tutorial was written
by Sarah Fiack on
December 2, 2013
Any resemblance to another
tutorial is purely coincidental.
I am using 4 tubes by Cuddly Rigor Mortis
which you can purchase at
CDO
I am also using the scrap At The Movies -
mini by Rebel Dezigns which you can also
purchase at CDO
Mask WSL Mask151 by
Weescotslass blog
Open a 700x700 new image.
Open up your tubes and scrap
supplies.
Open up a rectangle frame.
Copy and paste as a new layer
onto your new image.
Choose your selection tool.
Draw out a rectangle selection
around center of your frame.
Choose a stage element.
Paste as a new layer & position
in the center of your tag.
Selections invert & press delete
button.
Keep selected. Open a seated
audience element. Paste as a
new layer. Position along the bottom
of the tag.
Press delete.
Select none.
Move both the stage and audience
layers underneath the frame layer.
Add a drop shadow to the audience
and frame layers. 2,2,50,5 black.
Choose 3 of your tubes.
Resize each one 40%.
Position on the tag side by side.
Merge the 3 tubes together.
Move this layer down to above
the stage layer.
Add the above drop shadow as
well to the tube layer.
Open red rope walk way element.
Resize 50%. Paste as a new layer.
Position down in front of the frame.
Take your 4th tube. Resize 60%.
Paste as a new layer between
the 2 red ropes. Add the above drop
shadow to the tube.
Open a film reel element.
Resize 30%.
Paste as a new layer & position
on the top left corner of
the tag.
Open a star element.
Resize 25%. Paste as new layer
onto the center of the film reel.
Open a ticket element.
Resize 50%.
Rotate -free rotate left
90.00.
Position this tag layer underneath
the reel layer- like it is coming out
from underneath it.
Open a wordart of choice.
I am using one which comes
with the scrap I chose.
Resize 50% as needed.
Position on the right side
of the red rope layers.
Paste a paper of choice
above the bottom layer
of the tag.
Apply the mask WSL Mask151
Merge group.
Duplicate the mask layer once.
Merge the two mask layers together.
Resize this layer 107%.
Merge all the layers visible.
Add artist copyright information
and name.
Save as png.
Thanks for trying my tutorial.

This tutorial was written
by Sarah Fiack on
December 2, 2013
Any resemblance to another
tutorial is purely coincidental.
I am using 4 tubes by Cuddly Rigor Mortis
which you can purchase at
CDO
I am also using the scrap At The Movies -
mini by Rebel Dezigns which you can also
purchase at CDO
Mask WSL Mask151 by
Weescotslass blog
Open a 700x700 new image.
Open up your tubes and scrap
supplies.
Open up a rectangle frame.
Copy and paste as a new layer
onto your new image.
Choose your selection tool.
Draw out a rectangle selection
around center of your frame.
Choose a stage element.
Paste as a new layer & position
in the center of your tag.
Selections invert & press delete
button.
Keep selected. Open a seated
audience element. Paste as a
new layer. Position along the bottom
of the tag.
Press delete.
Select none.
Move both the stage and audience
layers underneath the frame layer.
Add a drop shadow to the audience
and frame layers. 2,2,50,5 black.
Choose 3 of your tubes.
Resize each one 40%.
Position on the tag side by side.
Merge the 3 tubes together.
Move this layer down to above
the stage layer.
Add the above drop shadow as
well to the tube layer.
Open red rope walk way element.
Resize 50%. Paste as a new layer.
Position down in front of the frame.
Take your 4th tube. Resize 60%.
Paste as a new layer between
the 2 red ropes. Add the above drop
shadow to the tube.
Open a film reel element.
Resize 30%.
Paste as a new layer & position
on the top left corner of
the tag.
Open a star element.
Resize 25%. Paste as new layer
onto the center of the film reel.
Open a ticket element.
Resize 50%.
Rotate -free rotate left
90.00.
Position this tag layer underneath
the reel layer- like it is coming out
from underneath it.
Open a wordart of choice.
I am using one which comes
with the scrap I chose.
Resize 50% as needed.
Position on the right side
of the red rope layers.
Paste a paper of choice
above the bottom layer
of the tag.
Apply the mask WSL Mask151
Merge group.
Duplicate the mask layer once.
Merge the two mask layers together.
Resize this layer 107%.
Merge all the layers visible.
Add artist copyright information
and name.
Save as png.
Thanks for trying my tutorial.
Subscribe to:
Posts
(Atom)
Zone Award
