






Showing posts with label Template. Show all posts
Showing posts with label Template. Show all posts
Wednesday, June 4, 2025


Monday, January 18, 2021
I created a clock template which was inspired
by a tag challenge. The theme was New & Time.
You are welcome to use it for personal use
&/or tag challenges. Just do not claim as your own.
You can download the template here.
I also am showing the tag I made using the template.
Featuring art by Sheena Pike using her tube 4-1.
Sheena Pike 4-1 IB by Chaos Priestess
Artist is currently selling at DAH


Sunday, March 1, 2020
I participated in the Misfits Blog Challenges
for the first time!! For my part, I
did Template & Wordart.
The template is Spring Themed
& available here.
The wordart is a mix of Spring
& St. Patty's themed &
available here. While you are there,
check out all the goodies made
by other Misfit members.


Sunday, February 23, 2020

This tutorial was written by me
on February 23, 2020
Any resemblance to another
tutorial is purely coincidental.
I am using the tube 45-1 by Hannah Lynn.
Plugins:
Toadies - Glasswork Grey
Mura's Meister -Copies
VM Natural Transmission
Open up a new image 700x700.
Open up a tube of choice.
Open up the template I have provided for
this tutorial.
Fill each rectangle layer with a different color.
Make sure you select each layer before you fill it
with a different color.
For the main square layer, select a darker color than
the previous ones you have used.
Copy & paste your tube as a new layer above the rectangle layers.
Arrange so it covers the Left rectangle layer. Select the inside of
the rectangle layer with your magic wand tool.
Selections - Invert & select the tube layer.
Press delete on your tube layer.
Select none.
Duplicate the tube once & mirror.
This should position it on the opposite side
on top of the Right Rectangle.
Duplicate each of the tube layers once.
You want to arrange so they line up on the rectangle layers
with them facing Left - Right - Left - Right.
Now in your layers palette, arrange each tube layer above the
color rectangle layer it is positioned above.
Okay now on the Left & Middle Right Tube Layers, apply the plugin
VM Natural Transmission...default settings.
Change the blend modes on each of these layers to Overlay.
On the Middle Left & Right tube layers, apply the plugin
Toadies - Glasswork Grey to each of the tube layers with default settings.
Change the blend modes to Soft Light.
Duplicate the Main Square layer & hide the original Main Square layer.
Arrange the copy above the other layers.
Set the blend mode to Hard Light & lower the opacity to 57.
Select your Text tool. Choose a font of choice.
Type out a single word or two. Convert to Raster.
Use Mura's Meister - Copies.
Select the option of Tiling. Change the Tile Gap to 2
& click Ok.
Click the Main Square Copy Layer with your Magic Wand tool.
Click Invert. Select the wording you just tiled.
Press delete on your keyboard. Select none.
Change the blend mode on the word layer to Soft Light.
Duplicate the bottom layer twice.
On the top duplicated layer,
Set the Foreground on your Materials palette to a dark color.
Select your Airbrush tool. Using a Brush effect of choice,
apply it to the bottom duplicated layer in each of the corners.
I used a cross hatch type brush.
On the other duplicated layer, fill with a color of choice.
Apply a mask of choice. I used the mask LLM-901.
Merge group. Resize the mask 94%.
Merge layers together. Crop your tag.
Add copyright information & name to your tag.
Save as png. Thanks for trying my tutorial.
Saturday, September 28, 2019
CT timeline featuring the wonderful art of
Melissa Dawn using her tube 26-1.
I am also showcasing the halloween
filled scrap Pinuptoons 204-1
by Karmalized Scraps. This sweet
looking kitty is ready for halloween
& all of its spookiness. She'll help
you decorate & celebrate every day.
Be sure to give her pets as you
find her nestled in among the
decorations.


Saturday, July 14, 2018

This tutorial was written
July 14, 2018
Any resemblance to another
tutorial is purely coincidental.
I am using a tube by Enamorte that was exclusive
to CDO Diamond Club.
Mask007 by JustFi
JustFi_DiamondTemplate001
Both are available here for download &
are shared with permission from her.
Scrapkit: Inspired by Enamorte AOTM 2015
Scrap by Ladyhawwk Designs
Open up your template & tube.
Ctrl D with the template to duplicate it.
You can now hide the original template.
On the template, delete the info
& the white background layers.
Now I like to work with a larger
area so I used Canvas Size & increased
my work space with the template to 700x700.
Select a paper of choice.Paste as a new a layer.
Position underneath the noisy template layer.
On the noisy layer, select all - float - defloat
& invert. Click back to the paper layer & press delete
on your keyboard. Select none.
On the noisy layer, change the blend mode to Overlay.
Using the same paper, paste again as a new layer. Position as
wanted over the Stripes layer. On the Stripes layer, select all - float - defloat
& invert. Click back to the paper layer & press delete
on your keyboard. Select none. Merge the two Stripes layers together.
Next, select the Outer Ellipse/Frame layer of the template.
Paste a different paper of choie as a new layer. With the Ellipse
layer, On the noisy layer, select all - float - defloat
& invert. Click back to the paper layer & press delete
on your keyboard. Select none. Merge the two ellipse layers together.
Paste your tube as a new layer under the Ellipse/Frame layer.
Resize if needed depending on the tube you are using.
Click inside the Ellipse layer using your Magic Wand tool.
While selected, go to Selections - Modify -Expand by 3.
Selections - Invert & click on the tube layer. Press delete & select none.
Right click on the tube layer & duplicate the tube once.
On the top layer, go to Adjust - Hue/Saturation. Set both values to 0
& click Ok. Change your blend mode to Overlay or one that fits your tag better.
On the original tube layer, lower the opacity on this layer to 65.
Add a drop shadow of choice to the layers we have worked with so far.
Now on to the letters of the template. This part will be a tad repetivite
as its best to do each letter one at a time. I tried merging them together
& found it didn't work as well.
Okay select a paper of choice. Select the letter D layer. Select all - Float &
Defloat. Selections - Invert. Paste your paper as a new layer. Press delete.
Select none. I changed the Blend Mode of the paper to Overlay on my tag.
Merge the paper letter layer with the original letter layer.If you want, you can
alternate between two papers for every other letter also.
Repeat the above steps for each letter of the wording.
Select a flower or element of choice from the scrap you are using.
I resized the one I used by 40%. Paste as a new layer & position to the bottom side of your word. Arrange this layer to the bottom layer of your tag.Duplicate the flower once & mirror.
Add a new raster layer on the bottom of your tag. Fill with a color from your tube.
Apply the mask JustFi_Mask007 or one of choice. Merge group.Duplicate the mask layer once & merge the two mask layers together.
Crop your tag to desired size. Add artist copyright information & name.
Save as png. Thanks for trying my tutorial.
Thursday, July 31, 2014


Saturday, January 25, 2014
I did this template as a tag challenge in CDO Group. I figured we are all siggie piggies
so I would go along that route for the template lol.
Here is a preview of the template

and you can dowload it here
You are welcome to use in challenges just be sure
to send them to my blog to find it.
Here is also a tag I did with the template. I used 2 piggies on it by Maxine Gadd
and a matching IB Scrap by Ladyhawwk Designs. You can find both available at
CDO.

so I would go along that route for the template lol.
Here is a preview of the template

and you can dowload it here
You are welcome to use in challenges just be sure
to send them to my blog to find it.
Here is also a tag I did with the template. I used 2 piggies on it by Maxine Gadd
and a matching IB Scrap by Ladyhawwk Designs. You can find both available at
CDO.

Thursday, January 16, 2014
I did a calendar template for a tag challenge today. Thought I would share the template. It's done for February 2014 but you can easily change it around if you want.It's not perfect but hey its my first one lol. I also have a snag of a finished calendar as well.
Download Here
and here is the snag

Download Here
and here is the snag

Friday, November 15, 2013
New template by me today.It's a forum style template using the shapes
circles & rectangles.
FTU - feel free to snag & use. If used as a challenge, please
send them to my blog to snag it.

Preview of template as a tag. For the tag, I used the artist Michi Art - tubes are available at CDO

Download Here
circles & rectangles.
FTU - feel free to snag & use. If used as a challenge, please
send them to my blog to snag it.

Preview of template as a tag. For the tag, I used the artist Michi Art - tubes are available at CDO

Download Here
Wednesday, June 5, 2013
It's been a long time since I made a template. But thought I would share the one I did today.
You can find my older ones on my old blog here. I also did a sample tag using the template.
For that, I used tubes by Joel Adams which you can find at CDO.
I also used a Steampunk scrap by Bibi which you can find at SATC.
Download template
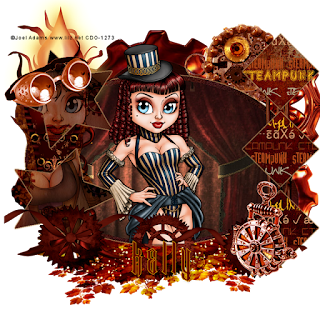
You can find my older ones on my old blog here. I also did a sample tag using the template.
For that, I used tubes by Joel Adams which you can find at CDO.
I also used a Steampunk scrap by Bibi which you can find at SATC.
Download template


Subscribe to:
Posts
(Atom)
Zone Award
