



Showing posts with label UYA. Show all posts
Showing posts with label UYA. Show all posts
Wednesday, January 22, 2014

This tutorial was written
by Sarah Fiack on
January 22,2014
Any resemblance to another
tutorial is purely coincidental.
I am using a tube by Sue Miller.
You have to purchase this tube at
UpYourArt to use it.
VixMask 309
which you can find here
Open a 700x700 new imge.
Open up a tube & image of choice.
On your materials palette, hide
the fill color box.
Select a color of choice for the stroke
box from your tube.
Select your font tool.
Set width to 3.00
Choose chunky type font.
Set size to desired size.
Type out text of choice.
Makre sure caps lock is on also.
Enlarge if needed.
Convert to raster.
Holding shift button down,
select inside each letter
of the word with your magic
wand tool.
Selections - modify -expand by 1.
Paste your image as a new layer.
You may need to paste it twice if
it won't fill the word.
Selections - invert & press delete
on your keyboard. Select none.
Move the image layer under the
letter layer.
Making sure you are
still on the image layer, Adjust
Hue & saturation -change both
to 0. This greyscales the image.
Paste your tube as a new layer.
Make sure this layer is above
your word layers.
Resize to 70%.
Now I used my freehand selection
tool to select around one of the swans.
I then copied and pressed delete.
I pasted the swan again as a new layer.
This gave me the swans on two different
layers and allows me to move them
independently of one another.
I positioned one swan along the top
of the word and one along the bottom
of the word. Drop shadow both the
swan layers.
2,2,25,5 black.
On your materials palette,
select both boxes to be the same color
from your tube.
Select preset shape tool. I chose a heart
shape but its up to you.
Draw out a medium shape. Convert to
raster. Move this layer to under the
word layers. Positon it roughly in
the center of the word.
If needed, fill with the color on your
materials palette.
Now change the material palette
boxes to black.
Select the rectangle preset shape tool.
Draw out a thin narrow horiztonal
rectangle. Convert to raster.
Make sure this layer is below all
the previous layers.
Select your font tool.
Choose a font of choice.
Make sure width is 0.00.
Add the words "the of" to the tag.
I put "the" above the heart &
"of" beside the heart above the
main word.
Convert each to raster.
Duplicate the backrgound/raster1
layer of the tag. Fill this layer with
a color of choice. Apply the mask
VixMask 309.
Merge group. Duplicate this layer
once & merge down.
Merge layers visible.
Apply the plugin Xero Porcelain
Softness 50
Strength & Brightness 128
Crop to desired size. Add artist
copyright information and name.
Save as png.
Thanks for trying my tutorial.
Sunday, January 12, 2014

This is a timeline tutorial. But you could easily
convert to a forum style tag.
This tutorial was written
by Sarah Fiack on
January 12th, 2014
Any resemblance to another
tutorial is purely coincidental.
I am using 1 tube by Cris DeLara
which you can purchase at
TPP
No scrapkit needed.
Dingbat font of choice.
I used the font KR All Sport
Plugins:
Muras Meister Copies
VM Natural -Acid Rain
VM Stylize- Motion Trail
Toadies -Glasswork Gray
UnPlugged Tools -REM Lotus
Open a timeline size image.The size
for this is 851x315.Open your tube
of choice.
Fill with a dark color from your tube.
For mine I am using black.
Select your ellipse preset shape tool.
Make sure the circle shape is selected
on the settings.
On your Materials palette,
X out the stroke box as we don't
need it at the moment.
Select a color from the tube for
your fill box. I am using red.
Draw out a smallish circle
on your image. Convert to
raster.
Apply the plugin effect
Muras Meister Copies.
Tiling Angle. Change tile gap
to 2 for this.
Click Okay.
Change the color on your
materials palette for the
fill. I am using a light
purple.
Draw out a large
circle to take up most
of the center of the timeline.
Objects - align -center in canvas.
Convert to raster.
VM Natural Plugin
Acid Rain -default settings
VM Stylize Motion Trail
default settings
Duplicate the circle layer
once. Make sure the
copy layer is selected in your
layer palette.
Apply the plugin Toadies
Glasswork Gray - default settings. Click Apply.
Resize this layer 75%.
Merge the two circles together.
Plugin UnPlugged Tools
REM Lotus -default
Round button -default
Take your tube & paste onto
the circle image you've been
working on.
Resize the tube 60%.
Go to effects - 3d effects-cutout
default settings. Make sure both
colors are set to black. Click okay.
Paste your tube again. Resize 65%.
Position on the left side of the circle.
You want it partly over the circle
and partly off it.
Add a drop shadow to the 2nd
tube layer and the large circle layer.
2,2,50,5 black.
Now click on the multiple
circle layer of the timeline.
Select your font tool and a
font of choice. I am using a sports
dingbat font.
On your Materials palette, select
the fill box to a white or similar color.
Also make sure stroke is set at 0.0
on font settings. Font size to 14 or
as wanted.
For the dingbat I wanted, I did
a Capital E to get bowling icon.
Enlarge if needed. Convert to raster.
Do an icon on each side of the main circle.
Merge the two icons together.
Change the blend mode in your layer
palette to soft light.
Select your rectangle preset shape
tool. Change the fill box on materials to
black. Make sure the rectangle shape is
selected.
Draw out two rectangles on the upper
right side of the timeline. Make one
wider and slightly longer than the
other one. Convert to raster &
merge the two layers together.
Select your font tool.
Choose the white color again.
Select a font you like for your tag.
Add a word per rectangle which fit
yours. I am using Bowling & Strike
for mine.
Merge layers visible.
Add a new raster layer.
Fill with color of choice
from your tag. This is for
the border.
Click the layer with your
magic wand tool.
Selections -contract by 4.Press
delete button on your keyboard.
Select none.
Add artist copyright for the
company timelines. Some companies
vary on their timeline rules.
Make sure to add a name as well.
Save as png or jpeg.
Thanks for trying my tutorial.
Tuesday, January 7, 2014

Note : There are two examples as I liked both tubes
with the tag a lot & couldn't decide lol
This tutorial was written
by Sarah Fiack on
January 7th, 2014
Any resemblance to another
tutorial is purely coincidental.
I am using 1 tube by Camilla Drakenborg
which you can purchase at
UpYourArt
I am also using PTU Scrap Melina
by Amy Marie which you can purchase
at her store
Vixmask132 by Vix
Here
Open a 700x700 new image.
Open up your tube and
scrap supplies.
Open a rectangle wordart
from the scrap.
Paste as a new layer.
Move down some so it is
near the bottom of your
tag.
Select your tube.
Resize 88%.
Paste as a new
layer. Position on your
tag so the edge of the tube
meets the wordart element.
Move the tube layer under the
wordart layer in your layer palette.
Select your rectangle
preset shape tool.
Make sure width is set
at 2.00
Open a scrap paper of choice.
On your Materials palette,
click on each square - select
palette option. Make sure you
select the paper you opened.
You want the paper to show in
both squares.
Now draw out a vertical rectangle.
Draw out in similar size to the wordart
rectangle. Convert to raster layer.
Move into position along the right
side of your tube.
I do have this layer under the wordart
rectangle layer.
Open a rose element.
Paste as a new layer.
Move to the left side.
In your layer palette, move the rose
to below the tube layer. You want it
coming up behind your tube on the
left side.
Open a flower cluster.
Paste as a new layer below
your rose layer. But move the cluster
to up above the rose & partly behind
your tube as well.
Open a flower necklace element.
Mirror the element.
Paste the element as a new layer
behind your tube. Arrange so it comes
up on the right side behind your tube.
You want this layer above the 2 previous
flower layers.
Open a corner flower element.
Resize 80%. Mirror once.
Paste at the top of the right
side of the tag. You want this flower
to appear at the top of
the rectangle shape layer & behind
your tube as well.
Paste a paper of choice above the
bottom layer of the tag.
Apply the mask Vixmask132.
Merge group.
Rotate -free rotate -right 90.
Mirror once.
This should give you a sort of
background for the tag.
Add a drop shadow to the tube,
flower layers and the rectangle layers.
2,2,50,5 black.
Using your selection tool,
select the vertical rectangle element.
Open a flower doodle. Resize 50%.
Paste as a new layer on the rectangle.
Selections - invert & press delete.
Select none. Should leave the flower
doodle on the rectangle but remove
any outside of the selection.
Duplicate the doodle & flip.
Move so part of the copy doodle
overlaps the first doodle.
Merge layers visible.
Crop to desired size.
Add artist copyright & name
for tag.
Save as png.
Thanks for trying my tutorial.

Saturday, December 14, 2013

This tutorial was written
by Sarah Fiack on
December 14th, 2013
Any resemblance to another
tutorial is purely coincidental.
I am using a tube by Zephir d'Elph
This tube is available at
UYA
I am also using Christmas Mint
scrap by Amy Marie which can also be purchased
at her store
TreseMask0043
Blog Here
Open a 700x700 new image.
Open up your tube and scrap
supplies as well.
Take your tube & copy and
paste as a new layer onto
your 700 image.
Resize the layer 80% & 85% once
each.
Move down a bit on your tag.
Open a sleigh bell element.
Resize 70%.
Mirror.
Paste beside your tube.
You do want this element
to be on the layer below
your tube layer.
Open a tree element.
Paste as new layer.
Position this layer below your
main tube layer on the layer
palette.
Open a fence element.
Resize 50%.
Making sure you are on the
bottom layer in your layer palette,
Paste the fence as a new layer.
Position on the bottom half of
the tag slightly to the right.
Duplicate the layer once & mirror.
Merge the two layers together.
Open a fruit element.
Resize 25%.
Paste as new layer in front of
the fence & tube.
I positioned mine on the
bottom left side.
Open a snowman element.
Paste on the bottom layer.
You want the snowman on the
left side of the tag behind
the fence.
Add a drop shadow to the tube, tree
& fence layers. 2,2,50,5 black.
Open a bird branch element.
Resize 50%. Mirror.
Paste as a new layer.
Position on the right side
behind the tree & fence layers.
You want the branch to appear to be
coming from the tree.
Open a window frame.
Paste as a new layer.
Select your magic wand tool.
Holding shift button down,
click inside each empty part
of the frame to select all.
Selections - modify -
expand -by 5
Paste a paper of choice
as a new layer.
Selections invert &
press delete button on keyboard.
Select none.
Move the frame under the
previous layers.
Move frame paper under the
frame layer.
Add the earlier drop shadow to the frame
layer.
Paste a paper of choice as a
new layer. Make sure in your layer
palette, the paper is below the
frame layers.
Apply the mask TreseMask0043.
Merge group
Merge layers visible.
Crop to desired size.
Add artist copyright information
to the tag; along with a name.
Save as png.
Thanks for trying my tutorial.
Thursday, November 21, 2013
Enchanted Frog

This tutorial was written
by Sarah Fiack on
November 21st, 2013
Any resemblance to another
tutorial is purely coincidental.
I am using 1 tube by Sarah Pauline.
This tube is available at
MTA
I am also using the PTU scrap Enchanted
by Hungry Hill
available at Treasured Scraps
Plugin:
Xero Porcleain
Open a 700x700 new image.
Open up a tube and scrap supplies.
Choose a frame of choice.
Resize 88% if needed.
Copy and paste as a new layer.
Click inside the frame with your
magic wand tool.
Selections modify - expand by 15.
Paste a paper of choice as a
new layer.Selections invert
& press delete.
Move the paper layer underneth
the frame layer in your layer
palette.
Keep selected.
Open a grassy hill element.
Paste as a new layer between
the paper & frame layer.Position
on your tag near the bottom of
the tag. Press delete.
Now in your layer palette, make sure
you have the paper layer clicked
or ( highlighted ).
Paste your tube as a new layer.
Position as wanted if needed.
Press delete.
Select none.
Add a drop shadow to the
tube,frame & grassy hill layers.
2,2,50,5 black.
Open a vertical vine.
Resize 80%.
Paste as new layer & arrange
on the right side of the tag.
Add the above drop shadow to
the vine.
Open mushroom element.
Resize 25% and 80% once each.
Paste by the bottom of the vine
element.
Open a bench element.
Resize 50%.
Paste as a new layer & position
by the vine & over the mushroom
element.
Paste a paper of choice as
a new layer above the bottom layer
of the tag ( but below any of the tag layers).
Apply the VixMask389.
Merge group. Resize this layer 109%.
Duplicate the mask once.
On the bottom mask layer, adjust
blur - Gauassian blur 3.00
Merge layers together.
Apply the plugin Xero Porcleain
Softness 50
Strength & Brightness 128.
Crop to desired size.
Add copyright information and name.
Save as png.
Thanks for trying my tutorial.

This tutorial was written
by Sarah Fiack on
November 21st, 2013
Any resemblance to another
tutorial is purely coincidental.
I am using 1 tube by Sarah Pauline.
This tube is available at
MTA
I am also using the PTU scrap Enchanted
by Hungry Hill
available at Treasured Scraps
Plugin:
Xero Porcleain
Open a 700x700 new image.
Open up a tube and scrap supplies.
Choose a frame of choice.
Resize 88% if needed.
Copy and paste as a new layer.
Click inside the frame with your
magic wand tool.
Selections modify - expand by 15.
Paste a paper of choice as a
new layer.Selections invert
& press delete.
Move the paper layer underneth
the frame layer in your layer
palette.
Keep selected.
Open a grassy hill element.
Paste as a new layer between
the paper & frame layer.Position
on your tag near the bottom of
the tag. Press delete.
Now in your layer palette, make sure
you have the paper layer clicked
or ( highlighted ).
Paste your tube as a new layer.
Position as wanted if needed.
Press delete.
Select none.
Add a drop shadow to the
tube,frame & grassy hill layers.
2,2,50,5 black.
Open a vertical vine.
Resize 80%.
Paste as new layer & arrange
on the right side of the tag.
Add the above drop shadow to
the vine.
Open mushroom element.
Resize 25% and 80% once each.
Paste by the bottom of the vine
element.
Open a bench element.
Resize 50%.
Paste as a new layer & position
by the vine & over the mushroom
element.
Paste a paper of choice as
a new layer above the bottom layer
of the tag ( but below any of the tag layers).
Apply the VixMask389.
Merge group. Resize this layer 109%.
Duplicate the mask once.
On the bottom mask layer, adjust
blur - Gauassian blur 3.00
Merge layers together.
Apply the plugin Xero Porcleain
Softness 50
Strength & Brightness 128.
Crop to desired size.
Add copyright information and name.
Save as png.
Thanks for trying my tutorial.
Tuesday, November 12, 2013
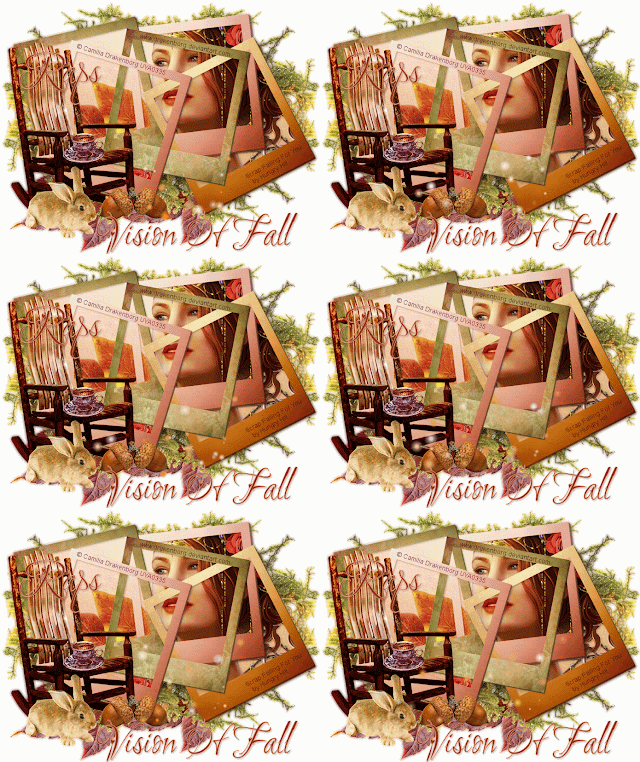
Vision Of Fall
This tutorial was written
by Sarah Fiack on
November 8th, 2013
Any resemblance to another
tutorial is purely coincidental.
I am using a tube by Camilla Drakenborg.
You have to purchase this tube at
UpYourArt to use it.
I am also using the PTU scrap Falling For You
by Hungry Hill.
You can find her scraps at Treasured Scraps
Animation 261
by Simone Scrappy Bit Of Fun
here
Open a 700x700 new image.
Open up your tube and scrap
supplies.
Choose a frame cluster element-
multiple photo frames together.
Copy merged and paste as
a new layer onto your image.
Resize this layer 85%.
Select your magic wand tool
While holding shift button down
on your keyboard, select the
inside parts of the frames.
Keep holding shift down to
make sure they all stay selected.
Selections modify -expand
by 5.
Paste a paper of choice as
a new layer. Selections invert
& press delete. Move the
paper layer underneath the
frame layer.
Paste your tube as a new layer
between the paper and frame layers.
I mirrored mine before pasting but
that is optional.
Press delete.
Open a leaf branche element.
Paste behind your main tube layer.
You want it coming out from behind
your tube in the frames.
Press delete button.
Select none.
Drop shadow the tube, leaf branch & frame layers.
2,2,50,5 black.
Open a moss/plant element. Resize 88%
Paste below the frame layers.
Position behind the layers but have it
coming out around the edges. Duplicate once
& flip.You want some moss coming out around
all the edges.
Merge the two moss layers together.
Duplicate once & Mirror.
Open a rocking chair element. Resize 50%.
Paste as a new layer & position to the
left side ( or side opposite your tube) of your tag.
Open a cup element. Resize 25% & 45% once
each. Paste as a new layer & position on the
seat of the chair.
Open a bunny or other animal element.
Resize 25% or as needed. Position by the side of
the chair.
Open acorns element.
Resize 25% & 80% once each. Paste by the bunny
and the chair.
Open a leaf element. Resize 50%.
Paste twice. Position one underneath
the chair layers and the other one beside it
underneath the frame layer & moss layer.
You want the leaves to be coming out.
Hide the bottom layer of the tag.
Merge the rest of the layers visible.
Duplicate once - on the bottom
merged layer, Adjust - Blur - Gauassian
Blur 3.00
Merge the two visible again.
Unhide the bottom layer.
Crop to desired size.
Add text of choice to the tag.
I used the text " Vision Of Fall"
Choose a font of choice of it
& colors from your tag.
Convert to raster.
Add artist copyright information
& name to the tag.
if you don't wish to animate,
then you can save your tag here.
To animate, continue below.
Copy your tag as copy merged. Now go to Animation
shop
and paste as a new animation.
Duplicate for the required number of frames
as your animation has.
For the animation I am using, it has 21
frames. This means I have to duplicate
the tag image for a total of 21 frames.
To duplicate, hold down Ctrl and repeatedly
press the L button.
Down on the bottom right corner of AS,
it will show how many frames you have.
Once you have all the frames needed,
edit - select all.
Now on your animation, select all - copy.
Drag onto your tag image.
Select all - view animation.
If happy, save as gif


This tutorial was written
by Sarah Fiack on
November 8th, 2013
Any resemblance to another
tutorial is purely coincidental.
I am using a tube by Camilla Drakenborg.
You have to purchase this tube at
UpYourArt to use it.
I am also using the PTU scrap Falling For You
by Hungry Hill.
You can find her scraps at Treasured Scraps
Animation 261
by Simone Scrappy Bit Of Fun
here
Open a 700x700 new image.
Open up your tube and scrap
supplies.
Choose a frame cluster element-
multiple photo frames together.
Copy merged and paste as
a new layer onto your image.
Resize this layer 85%.
Select your magic wand tool
While holding shift button down
on your keyboard, select the
inside parts of the frames.
Keep holding shift down to
make sure they all stay selected.
Selections modify -expand
by 5.
Paste a paper of choice as
a new layer. Selections invert
& press delete. Move the
paper layer underneath the
frame layer.
Paste your tube as a new layer
between the paper and frame layers.
I mirrored mine before pasting but
that is optional.
Press delete.
Open a leaf branche element.
Paste behind your main tube layer.
You want it coming out from behind
your tube in the frames.
Press delete button.
Select none.
Drop shadow the tube, leaf branch & frame layers.
2,2,50,5 black.
Open a moss/plant element. Resize 88%
Paste below the frame layers.
Position behind the layers but have it
coming out around the edges. Duplicate once
& flip.You want some moss coming out around
all the edges.
Merge the two moss layers together.
Duplicate once & Mirror.
Open a rocking chair element. Resize 50%.
Paste as a new layer & position to the
left side ( or side opposite your tube) of your tag.
Open a cup element. Resize 25% & 45% once
each. Paste as a new layer & position on the
seat of the chair.
Open a bunny or other animal element.
Resize 25% or as needed. Position by the side of
the chair.
Open acorns element.
Resize 25% & 80% once each. Paste by the bunny
and the chair.
Open a leaf element. Resize 50%.
Paste twice. Position one underneath
the chair layers and the other one beside it
underneath the frame layer & moss layer.
You want the leaves to be coming out.
Hide the bottom layer of the tag.
Merge the rest of the layers visible.
Duplicate once - on the bottom
merged layer, Adjust - Blur - Gauassian
Blur 3.00
Merge the two visible again.
Unhide the bottom layer.
Crop to desired size.
Add text of choice to the tag.
I used the text " Vision Of Fall"
Choose a font of choice of it
& colors from your tag.
Convert to raster.
Add artist copyright information
& name to the tag.
if you don't wish to animate,
then you can save your tag here.
To animate, continue below.
Copy your tag as copy merged. Now go to Animation
shop
and paste as a new animation.
Duplicate for the required number of frames
as your animation has.
For the animation I am using, it has 21
frames. This means I have to duplicate
the tag image for a total of 21 frames.
To duplicate, hold down Ctrl and repeatedly
press the L button.
Down on the bottom right corner of AS,
it will show how many frames you have.
Once you have all the frames needed,
edit - select all.
Now on your animation, select all - copy.
Drag onto your tag image.
Select all - view animation.
If happy, save as gif

Subscribe to:
Posts
(Atom)
Zone Award