


Wednesday, February 29, 2012

Twinkle Twinkle
This tutorial was written
by Sarah Fiack on
February 29,2012
Any resemblance to another
tutorial is purely coincidental.
For this tutorial, I’m using
a tube by Queen Uriel.
You can purchase the tube at
her store.
Supplies:
Tube of choice
Scrap of choice.
I’m using one by designs by sarah
called Twinkle Twinkle
It is available at Pimp My Tags
with Scraps
Here
Open a 600x600 new image.
Open up your tube &
scrap supplies.
Open a frame of choice
from the scrap.
Paste as a new layer onto
the new image.
Using your selection tool,
draw around the center of
the frame. Once you have it all
selected, paste a paper of choice
as a new layer.
Selections invert & press delete.
Select none.
Move the paper layer under the frame.
Copy & paste your tube
as a new layer in front of the frame.
Add a drop shadow to both
the tube & frame layers.
2,2,50,5 Black
Open a star doodle.
Paste on one side of the frame
under the tube layer.
Arrange so the doodle is visible on the
side of the tube.
Duplicate the doodle once.
Mirror & rotate free rotate left 90.
You may have to move the doodle
up slightly.
Open a star splatter glitter.
Resize 60%
Paste behind your main tube layer.
Open a wordart.
I am using one which comes with the scrap.
Paste on the bottom layer of the tag.
Position so that it comes up above from underneath
the frame.
Merge layers visible.
Resize 88%.
Add copyright info & name.
Save as png.
Thanks for trying my tutorial.

This tutorial was written
by Sarah Fiack on
February 29, 2012
Any resemblance to another
tutorial is purely coincidental.
For this tutorial, I’m using a
tube by Rene Kunert
The tube is now FTU &
available here.
Supplies:
Tube of Choice
No scrap supplies needed.
Animation Shop
Plugins:
Muras Meister Copies
Xero Radiance
Xenofex 2 Lightning
Open a 600x250
new image.
Open your tube of choice
as well.
Copy & paste your
tube as a new layer
onto your image.
Apply the plugin
Mura's Meister Copies
Wallpaper rotate
default settings.
Duplicate the wallpaper
layer once so you have
two layers.
On the bottom layer,
Effects Texture effects Tiles
Tile shape Square
Color of choice
Angularity 0
Tile size 30
Border size 3
Smoothness 94
Depth 2 Ambiance 2 Shininess 5
Angle 315 Intensity 51 Elevation 32
On the top wallpaper layer,
Apply Xero Radiance
Strangeness 61
Charm 50
Truth 128
Beauty 255
Now lower the opacity on the
top layer to 50.
Add a new raster layer
on top of your tag image.
Fill with a color of choice
from your tube.
Click the layer with your
magic wand tool.
Selections modify contract
by 5.
Press delete.
Select none.
On the new border layer
you just created.
Adjust add noise
Uniform 25.
Paste your tube again
onto your tag.
This time as the top layer.
Add copyright info & name
to the tag before we do animaiton.
If you don't wish to animate, then
save your tag now :)
To animate:
Make sure you are on
the wallpaper layer with the Xero Radiance.
Select plugin Xenofex Lightning
Arc Thickness 16
Jaggedness 92
Branching 90
Branch Spread 36
Once applied, Copy merged & paste
into Animation shop as a new animation.
Return to psp and edit & undo.
Apply again & this time hit random seed once.
Copy merged and paste after current frame
into Animation.
Repeat this for a total of 5 frames in animation.
Select all the frames & change frame properties
to 20 to slow down the lightning animation.
Make sure all still selected & view animation.
if happy then save.
Sunday, February 26, 2012

Saturday, February 25, 2012

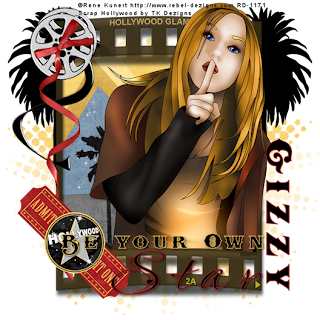
City Girl
This tutorial was written
by Sarah Fiack on
February 25, 2012
Any resemblance to another
tutorial is purely coincidental.
For this tutorial, I’m using a
tube & photo by Rene Kunert
The tube & photo are now FTU &
available here.
Supplies:
Tube of Choice
Photo of Choice
Scrapkit of choice
I am using a PTU In the City
by TK Dezigns.
You can purchase the scrap
at PMTWS
CityMask by Riekarafita
Blog
Open a 600x600 new image.
Open up your tube, photo &
scrap supplies.
Choose a city building scene
from the scrap.
Resize 85%
Copy & paste as a new layer.
Now, this part takes a bit
of patience. Using your magic
wand tool, & holding the shift
button down, click inside the
windows of the buildings.
Once you have them all selected,
selections modify expand by 5
Take your photo image.
Copy & paste as a new layer.
Selections invert & press delete.
Select none.
Move the photo layer under the
building layer.
Open a hydrant element.
Resize 35%.
Paste along one side of a building.
Resize your main tube 75%
or as needed.
Paste along the bottom of the
tag.
Open a bridge element.
Resize 75%
Paste between the tube & building
layers.
Open wordart from the scrap
or use one of choice.
Resize 80%.
Paste in from of the tube.
Add a drop shadow to the tube
& wordart layers.
2,2.50,5 Black.
Open a sun element.
Resize 90% & 88%.
Paste along the back of the buildings
on the bottom layer.
Add a new raster layer on bottom
of your tag. Fill with a dark color of choice.
Apply Citymask.
Merge group.
Merge layers visible.
Resize 88%.
Add copyright info & name.
Save as png.
Thanks for trying my tutorial.

I wanted to share this tag.
I did this for a mask challenge tonight.
I love the mask and the message it has.http://www.blogger.com/http://www.blogger.com/img/blank.gifimg/blank.gif
I used a Scrap Tube Combo Pack by Molly Harrison.
Available at CDO.
The mask can be found here by Aussie Scrap Designs.
We can all work on these things in our lives and we should all be blessed to have
them in our lives as well.
Tuesday, February 21, 2012

Sexy And I Know It
This tutorial was written
by Sarah Fiack on
February 21, 2012
Any resemblance to another
tutorial is purely coincidental.
For this tutorial, I’m using a
tube by Barbara Jensen.
You can purchase this tube at
her store.
Supplies:
Tube of Choice
Scrap of choice
I am using one called
Sexy & I Know It
by TK Dezigns
Available at PMTw/S
Plugin: EyeCandy4000 Gradient Glow
Open a 600x600 new image.
Open up your tube & scrap supplies.
Choose a rectangle frame of choice.
Resize 88% or as needed.
Copy & paste as a new layer.
Rotate free rotate left or right
90.
Click inside the frame with
your magic wand tool.
Selections modify expand by 5
Select none
Open a corner hanging element.
Resize 25% or as needed.
Paste on a top corner of the frame.
Duplicate once & mirror.
Open a ribbon chain element.
Resize 50%.
Paste on one side of the bottom part
of the frame. Duplicate once & mirror.
Open a flower element of choice.
Resize 35%
Paste on a bottom corner of the frame.
Add a drop shadow to the frame.
2,2,50,5 Black.
Copy & paste your tube as a new
layer. Paste in front of the frame.
Resize 88% if needed.
Open a large heart element
Resize 70%
Rotate free rotate 25 left.
Paste the heart on the bottom layer
of the tag.
Position on the left side behind the frame.
Duplicate the heart layer once.
Mirror it.
Move the copy heart layer down slightly
so that it appear behind your tube.
Open a wordart of choice.
I am using one which comes with the scrap.
Resize 65%
Paste along the tag as you want.
I added a gradient glow to the wordart.
EyeCandy4000 Gradient Glow
Fat glow width 3
Merge layers visible.
Resize 88%
Add copyright info & name.
Save as png.
Thanks for trying my tutorial.
Monday, February 20, 2012

Sharing a tag I made tonight. I used a cluster frmae by Deadly Desire Tagz called Jackie and a photo by me which you can see my photos here The tube I used is by Miss Megs & available at PSPTUBESTOP
Anyways I hope you all like it.
I have noticed that my tube buying has changed.
I was discussing this with my husband just tonight.
As with my starting fresh on the blog, & trying to improve my thinking - all of this has led me to do the reflecting on my psp life.
I find myself not needing a license from every single
tube company. I am becoming choosier about where I
shop. This is nothing against any store either...but a general observation.
First off, if I won't use the tubes, then there is no reason
for a license there.
2nd, Different tubes are appealing to me now.
I have noticed that what I wanted 2-3 years ago are not
the same artists I must have today. I certainly have plenty
of tubes from over the years of purchasing lol. Does this mean
I'm not buying tubes?? Certainly not, for I still do purchase my share of tubes. I wonder, if everyone took a step back, and re-evaluated themselves & their purchases & usage - would they still
purchase all the same ones? I may like a tube, but if it doesn't scream & yell to me as a must have, then I simply walk away by closing the webpage.
What makes us decide to purchase at a new company & get a license there? Is it the artist tubes or friends or the fact that everyone else is shopping there? Maybe a combination of them.
For me it is becoming these reasons: The artists there are wonderful; The company is a good company & run by good people. Now this doesn't mean some companies are run by bad people - no not at all. But I'm sure as taggers, we all have the stores we perfer to shop at the most often b/c customer service is great at them.Of course this can vary from person to person;
The same type of questions can be applied to Favorite artists.
How does one determine a favorite artist or artists? For myself, its the artwork along with the person behind the artwork.The artwork will first hook me but getting to know the person who creates it..that can often be wonderful.

Wednesday, February 15, 2012
This one is important to me. With the big anti bullying movement taking place, I thought this would send a good positive message to everyone. Be yourself it is okay. You don't have to be like everyone else.
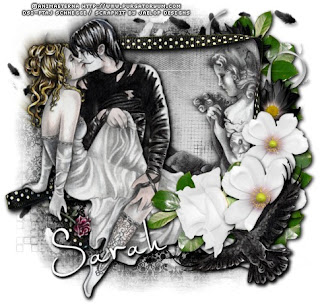
Be Your Own Star
This tutorial was written
by Sarah Fiack on
February 15,2012
Any resemblance to another
tutorial is purely coincidental.
For this tutorial, I’m using a
tube by Rene Kunert
The tube is now FTU &
available here.
Supplies:
Tube of choice
Scrap of choice.
I’m using one by TK Dezigns
Called Hollywood
It is available at Pimp My Tags
with Scraps
Here
Mask:
Kristin TD Mask8 Blog
Open a 600x600 new image.
Open up your tube closeup & scrap supplies.
Open a frame of choice &
paste as a new layer.
Click inside the frame with your
magic wand tool.
Selections modify expand by 3.
Paste a paper of choice as a
new layer.
Selections invert & press delete.
Move the paper layer under the
frame layer.
Paste your tube closeup between the
two layers.
Duplicate the closeup layer once.
Move the copy layer to the top in
your layer palette.
On the original closeup layer, press delete.
Select none.
Now back on the copy layer,
lower the opacity of the layer.
Erase the parts showing past the bottom of
the frame.
This helps give the layer an illusion of coming
out of the frame.
Return the opacity to 100.
Add a drop shadow to original closeup layer.
2,2,50,5 black.
Open a tree element.
Paste on the bottom layer on one side
of the frame. You want the top of the tree
visible. Duplicate once & mirror.
You want to have a tree on each side of
the tag.
Open a film reel element. Resize 70%
Rotate free rotate right 90 or as needed.
Position on the tag on a top corner of the frame.
Open a ribbon element of choice.
Resize 70%
Rotate Free rotate left 90.
Paste on the tag on top of the film reel layer.
Open tickets elements.
Resize 50%
Rotate free rotate right 45.
Paste along a corner of the frame.
Open a record/cd element.
Resize 25%
Paste on the tickets element.
On the bottom layer of the tag,
Paste a paper of choice as a new layer.
Apply the mask KristinTD Mask8.
Merge group.
Merge layers together.
Add wordart or your own saying.
I did a saying of my own.
Add a drop shadow to the text.
Resize everything 88%.
Add copyright info & name.
Save as png.
Thanks so much for trying my tutorial.
Saturday, February 11, 2012
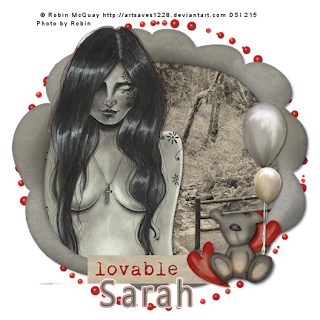
A dear friend & artist Robin McQuay needs help.
Purchase her artwork or order a commission.
Robin is trying to improve herself & her life and their
car just went Kaput completely on them. She is having a
big sale on her artwork to help raise funds for another car.
You can find out more details here
You can also purchase her tubes at DSI.
We always want to say thank you & help out the artists who
give our community so much..this is a chance to do that.
Robin is a sweetheart. I've been without a car before. Life gets
a lot harder when you don't have a ride to places.

Friday, February 10, 2012

Beautiful Spring
This tutorial was written
by Sarah Fiack on
February 10, 2012
Any resemblance to another
tutorial is purely coincidental.
For this tutorial, I’m using a
tube closeup by Rene Kunert
The tube is now FTU &
available here
Supplies:
Tube of Choice
Scrap of choice
I am using one called
Summer Breeze
by Schnegges Scraps
Blog.
BeckyMask022
Wordart by Word Art World
Here
Plugin EyeCandy2 Nature
Open a 600x600 new image.
Open up your tube closeup & scrap supplies
of choice.
Choose a frame of choice.
Paste as a new layer.
Click inside the frame with
your magic wand tool.
Selections modify expand by 2.
Paste a paper of choice
as a new layer.
Selections invert & press
delete on your keyboard.
Move the paper layer under
the frame layer.
Paste your tube closeup between
the paper & frame layers.
Duplicate once.
Move the copy layer to the top
in your layer palette.
Back on the original tube layer,
press delete.
Select none.
Now on the tube copy layer,
erase the parts of the tube
you don't want seen past the frame.
I erased the bottom part of the tube.
Add a drop shadow to the bottom tube
& frame layers.
2,2,50,5 Black
Open a kite element.
Resize 70% or as needed.
Paste along a side of the frame.
Open a bubbles sprinkles element.
Resize 70% twice.
Paste above the paper layer.
Open a butterfly element.
Resize 50%
Paste alongside the frame.
I did the opposite side of the kite
for my tag.
Open two flying butterflies.
Resize 70%
Paste on the bottom of the tag near
the top.
Open a bottle element.
Resize 50%
Mirror if needed.
Paste alongside the frame.
On the bottom layer of
the tag, Paste a scrap paper of choice.
Apply the mask
BeckyMask022
Merge group
Duplicate once & merge the two
mask layers together.
Now on the paper layer inside the
frame,
Select all, float,defloat
Plugin EyeCandy2 Nature
Waterdrops
Small drops Champagne
Default settings
Select none.
Open the wordart you are using.
I am using one which says Beautiful
Spring.
Resize by 50% three times.
If using a different wordart, skip the
next few steps.
Take your magic wand tool,
while holding shift button down,
click inside each letter of Spring.
Paste a paper of choice from the scrap.
Selections invert & press delete.
Select none.
Move the paper under the wordart.
Copy merged & paste onto your tag.
Position the wordart as wanted.
Add the earlier drop shadow to the wordart
layer on the tag.
Merge visible.
Resize 88%
Add copyright info & name.
Save as png.
Thanks so much for trying my tutorial.
Friday, February 3, 2012

Urban
This tutorial was written
by Sarah Fiack on
February 3,2012
Any resemblance to another
tutorial is purely coincidental.
For this tutorial, I’m using a
tube by Rene Kunert
The tube is now FTU &
available here.
Supplies:
Tube of choice
Scrap of choice.
I’m using one by TK Dezigns
Called Urban Chic
It is available at Pimp My Tags
with Scraps
Here
Wsl Mask126 by Weescottlass Creations
Blog
Plugin:
Xero Radiance
Open a 600x600 new image.
Open up your tube & scrap supplies.
Choose a frame of choice &
paste as a new layer.
Click inside the frame with your
magic wand tool.
Selections modify expand by 5.
Paste a paper of choice as a new
layer.
Selections invert & press delete.
Move the paper layer under the
frame.
Select none.
Add a drop shadow to the frame
layer.
2,2,50,5 black.
Merge the two layers together.
Now resize the merged frame layer.
80% or as needed.
Move down slightly & to the left hand
side of the tag.
Duplicate once.
Move the copy layer up & to the right.
You want them to be appear stacked.
Now paste your tube as a new layer.
Add the above drop shadow to it.
Open a corner element from the scrap.
Resize 70%
Paste on a corner of the frame.
Duplicate once -mirror & flip so it
is on another corner of the other frame.
Add drop shadow to both corner elements.
Open a 2nd frame of choice.
I am using a paint splatter one.
Resize 88%.
Paste on the bottom layer of the tag.
Open two ribbons of choice.
Resize 80% once & 90% twice.
Rotate free rotate left 45
or as needed.
Position on the tag along the two main
frames.
Drop shadow each ribbon.
Add a scrap paper as new layer on
the bottom of the tag.
Apply wsl mask 126.
Merge group.
Merge all layers visible.
Apply Xero Radiance Plugin
Strangeness 73
Charm 50
Truth 128
Beauty 255
Resize your tag 88%.
Add copyright info & name.
Save as png or jpeg.
Thanks so much for trying my tutorial.
Subscribe to:
Posts
(Atom)
Zone Award
