CT tag & wallpaper featuring the beautiful artof Keith Garvey using his tube 339-3.I am also showcasing the oh so lovelyscrap Snow In Love by Wicked Princess.The wallpaper is 1920x1080 &available here for download.Love isn't something you find. Love is something that finds you. - Loretta YoungLove is being stupid together. - Paul ValeryLove cures people - both the ones who give it and the ones who receive it. Karl - A. Menninger

Plugins:Mura's Meister CopiesOliver's FiltersXero PorcelainVM Stylize
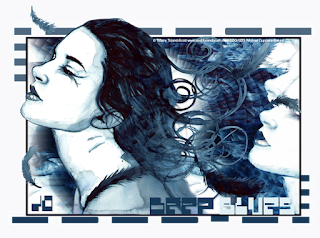
Mask: Kirsty07_Mask_49Not sure of creator of the mask.Please let me know if you do.
Open a 700x700 new transparent image.Open your tube of choice.
Make sure your new image is selected.Select your Rectangle Shape Tool. Set the widthto 5.00, On the Materials Palette, Hide the Background color option for now. On the Foreground,select black or a dark color from your tube.Now, draw out a rectangle to a desired size.Convert this layer to raster.
Copy & Paste your tube onto the image.I did resize mine 80% due to size. Move the layer underneath the rectanglein your Layer Palette.
Let's rename the layers to help keep them straightas we design. For the Rectangle shape layer - rename Rect.For the tube layer underneath that layer, rename Tube1.
On the Tube1 layer, apply the plugin Mura's Meister Copies-Wallpaper with default settings.Add a new raster layer underneath the Tube1 layer.Rename it Color. On the Materials palette, switch your colors& unhide the previously hidden layer. Select a color from your tube for the layer. Now fill the layer with that color.
Select the Rect layer. Select your Magic Wand tool & click insidethe layer. Selections - Modify - Expand by 2. Selections - Invert.Now keep it selected & select each layer & press delete on each one.Once done, select none. This will remove excess of each layer outside of the Rect.
Duplicate the Tube1 layer. Rename as Tube2. Apply the plugin Oliver's Filters- Tunnel with default settings. Apply Xero Porcelain with default settings as well. Hide this layer for now. Select Tube1 layer.
Apply the plugin VM Stylize - Deep Crunch to the layer with default settings.On the two tube layers, change the blend modes as such:Tube 2 - Soft Light Tube 1 - Screen. Feel free to change these if they don't look good with your tag/tube.
Select the Rect layer of your tag. Copy & Paste your tube again as a raster layer. Position as wanted on your tag. I did adjust mine so its more of the left side. Duplicate once. Move one of the layers underneath the Rect layer.
Select the Rect layer. Select your Magic Wand tool & click insidethe layer. Selections - Modify - Expand by 2. Selections - Invert.Now keep it selected & select the tube layer you just moved under the Rect layer. Press delete on this layer. Select None.
Using your Eraser tool, erase the bottom of the top tube. Don't worry if you get a little more than you should. You have the layer beneath the Rect layer which will cover that. Rename these as Top2 (Above Rect layer) & Top1 (Under Rect layer)
Add a drop shadow of choice to each layer except Top2.Merge layers visible. Resize 93 & 96%. Add a new raster layer under the merged layers. Fill with same color as the earlier Color layer. Go to Layers -Load Mask - Apply the mask Kristy07_Mask_49. Merge Group.
Choose a font of choice that fits your tag theme. Type out a wordor two. I chose the words Deep Blues. Position along the bottomright of your tag along the Rect layer. Make sure to add a drop shadow of choice.
Crop your tag to desired size. Be sure to add artist copyright information & a name to your tag. Save as a png. Thanks for trying my tutorial!
New tag by me featuring the wondefullywhimsical art of Amy Brown using hertube 91-2. I am also showcasing the oh so beautiful IB Yuriko Shirou 20-2Scrap by Wicked Diabla.Christmas is like candy; it slowly melts in your mouth sweetening every taste bud, making you wish it could last forever. - Richelle E. Goodrich
Tube is available at DAH
CT tag & wallpaper featuring the beautiful art ofMisticheskaya using her tube Dina. She has a varietyof outfit colors ready to deck out your holiday& festive tags. I am also showcasing the oh soholiday fun filled scrap But First Presentsby Wicked Princess. The wallpaper is 1920x1080& available to download here."Our hearts grow tender with childhood memories and love of kindred, and we are better throughout the year for having, in spirit, become a child again at Christmastime." — Laura Ingalls Wilder“Christmas is a piece of one’s home that one carries in one’s heart.” — Freya Stark
New holiday wallpaper by me featuring the wonderfulart of PinUp Toons using his tube 206-2.I am also showcasing the oh so cute & festivescrap Frosty Holiday by Karmalized Scraps.The wallpaper is 1920x1080 & available here.“Christmas is a piece of one’s home that one carries in one’s heart.” — Freya Stark"It is Christmas in the heart that puts Christmas in the air.” — W.T. Ellis


