Sunday, June 10, 2012
1:42 AM | Edit Post

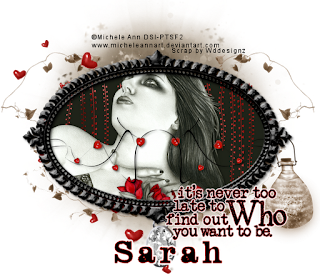
Never Too Late
I also have a 2nd tag below the tutorial
featuring the artwork of Robin McQuay.
This tutorial was written
by Sarah Fiack on
June 9,2012
Any resemblance to another
tutorial is purely coincidental.
For this tutorial, I’m using
a tube by Michele Ann
You can purchase her tubes at
DreamscapeImaging
Supplies:
Tube of choice
Scrap of choice.
I am using one called Diamond Hearts
The scrap is by Wddesignz.
You can purchase it at Whisprd Designz
Here
Wordart by Create with TLC
Blog
Plugin: EyeCandy4000 Gradient Glow
Open a 600x600 new image.
Open up your tube & scrap supplies.
Resize your tube 80%.
Choose a frame element.
Copy & paste as a new layer.
Click inside the frame with your
magic wand tool.
Selections modify expand by 8.
Add a new raster layer.
Fill this layer with a dark color
from your tube.
Move this layer underneath your
frame layer in your layer palette.
Open hanging vines element.
Resize 50%.
Paste inside the frame above your paper layer.
Erase any parts of the vines showing
past your frame.
Copy & paste your main tube
between the two layers.
Position as wanted on the tag.
Selections invert & press delete.
Select none.
Add a drop shadow to both the frame
& tube layers.
2,2,50,5 Black.
Open a circle blur element.
Flip this image.
Paste on the bottom layer of the tag.
Position behind the frame layers.
Open a leaf vine element.
Resize 95%.
Paste above the blur layer.
Duplicate once & mirror.
Open a hanging bottom element.
Resize 50%.
Paste as a new layer.
Position underneath the frame layers
on the side of the frame.
You want the bottle to appear to
"hang" from the frame.
Oepn falling hearts element.
Resize 50%
Paste twice on the tag above the circle blur layer.
Position one near the top left side of the tag.
Position the 2nd one undertneath the left side of the tag.
You want to see hearts at the top of the frame & below it.
Open a ribbon diamond element.
Paste underneath the frame layers.
Move so the ribbon is hidden under the frame layers.
You want the diamond visible & to appear to hang
from the frame.
Open a thin heart doodle.
Resize 50%
Paste in the frame.
You want this layer just below the frame layer.
Duplicate once & mirror.
Merge the two doodle layers together.
Add a drop shadow to the layer.
2,2,50,5 Black.
Open wordart of choice.
For the one I am using, I resized it by
50% twice & 80% once.
Add a gradient glow to the wordart.
Setting Fat ( I changed the color to red )
Glow width 3.00.
Paste as wanted on the tag.
Merge your tag layers visible.
Crop your tag to desired size.
Add artist copyright information & name.
Save as png.
Thanks for trying my tutorial.

Subscribe to:
Post Comments
(Atom)
TOUs
I do not allow resizing of my tags, timelines or wallpapers. All of my creations are for PU only unless otherwise stated. Nor are they to be altered in any way either.
Categories
- Abstract (22)
- ACDivas (2)
- Ad (1)
- addictive pleasures (3)
- ADI (2)
- Adriennes Design (6)
- Adult (8)
- Alicia Mujica (61)
- Amber (6)
- Amy Marie (222)
- Andrea Gibson (1)
- Angel (97)
- Animals (468)
- Animation (107)
- Anime (11)
- AORK (10)
- AOTW (8)
- Apocalyptic (5)
- Art-Content (1)
- Asian (8)
- Attitude (57)
- Authors (9)
- Autism (5)
- Autumn (39)
- award (3)
- Baby (1)
- BAS (1)
- BCA (7)
- BCS (28)
- Bella Caribena (2)
- birthday (3)
- Birthstone (10)
- Blaque Heart Designz (11)
- BLT DeZignZ (11)
- book suggestions (6)
- Cajoline (1)
- Calendar (2)
- Carnival (1)
- Carpe Diem (6)
- Cars (4)
- Casino (3)
- CCD (12)
- CCS (18)
- CDO (1545)
- Celestial Scraps (2)
- Celinart Pinup (1)
- Chaos Priestess (73)
- Charity (29)
- Chasing The Blues (2)
- Chelloenix Blog (1)
- Chichi (65)
- Children (30)
- Christmas (173)
- Cluster Frame (43)
- Color (6)
- Comic (6)
- copyright (2)
- Country (33)
- Crafty (2)
- Crazed Creations (1)
- Creative Misfits (3)
- CRM (24)
- Crowe (17)
- Crystal's Creations (20)
- CSBC (76)
- CU (12)
- cupcake (60)
- Cupcakes (44)
- CUPU (4)
- Cute (206)
- DAH (96)
- Dees"SIGN Depot (65)
- Devil (1)
- Dia De Los Muertos (2)
- Digital Chaos (61)
- Doodle by Design (41)
- Dreams (63)
- DSI (2)
- Easter (49)
- ELF (14)
- EliasC. (25)
- Elli's Creations (2)
- Emo (29)
- emotion (27)
- Extras (81)
- Fairy (185)
- Fall (182)
- Family (21)
- Fantasy (325)
- Farrah (4)
- Feature Tutorial (3)
- Food (165)
- Forum Style (38)
- Foxy's Designz (92)
- Freeks Creations (35)
- Freya (5)
- Friends (20)
- Friendship (14)
- FTU (122)
- Garv (20)
- Gimptastic (146)
- Gingerscraps (2)
- Girly (125)
- Goldwasser (8)
- Gothic (352)
- Gothic Inspirations (12)
- Guest CT (28)
- Halloween (222)
- Hania's Design (9)
- Happy (15)
- Happy New Year (8)
- Heartfelt Perfections (2)
- Help 4 Casper (2)
- Hollywood (4)
- Honored Scraps (230)
- Hungry Hill (171)
- Ilonka's Design (1)
- Inspiring (8)
- Irish Princess Designs (118)
- Jensen (106)
- Jose Cano (1)
- Karmalized (108)
- Kids (12)
- Kissing Kate (4)
- Kizzed by Kelz (81)
- Ladyhawwk (306)
- LaReina Designz (1)
- Layout (6)
- Learning (4)
- Life (98)
- LML Designs (1)
- Love (231)
- Magic (33)
- Mardi Gras (2)
- MellieBeans (11)
- Mental Health (5)
- Mermaids (67)
- MicroTut (19)
- Misc (6)
- Misticheskaya (25)
- Monsters (1)
- Monti's Scraps (22)
- Moon (56)
- MTA (18)
- Music (59)
- Mystery (1)
- Mystical Scraps (184)
- Nature (220)
- Nerd/Geek (1)
- New Years (10)
- Nocturne (28)
- Norella (3)
- Ocean (143)
- Overlays (10)
- Pagan (59)
- Paranormal (1)
- Patriotic (15)
- Peace (4)
- Phone Wallpaper (10)
- Photo (4)
- Pimp'd Designz (3)
- Pimpin Pspers Warehouse (3)
- Pink Paradox (1)
- Pinterest (1)
- Pirates (4)
- Poems (1)
- Poetry (11)
- Poser (4)
- Positive (7)
- Presents (2)
- Promo (25)
- PS (1)
- PSP (3)
- PTU (20)
- PU (1)
- Queen Uriel (44)
- Quickpages (14)
- Rac (9)
- Rebecca Sinz (174)
- Rebel Designz (123)
- Rene Kunert (27)
- Retro (7)
- Rissa's Designs (8)
- RMQ (47)
- Robot (2)
- Sale (3)
- Sams Scraps (1)
- Savage Dezines (2)
- Schnegge (14)
- School (21)
- Sci-fi (3)
- Scrap (23)
- Scrappin with lil ole me (1)
- Scraps of enchantment (1)
- Selina Fenech (13)
- Sexy (150)
- SGRowe (3)
- Sissys Sassitude (3)
- Snowmen (2)
- SophisticatSimone (8)
- Spazz (17)
- Special Friends (2)
- Sports (12)
- Spring (162)
- St Patty's Day (34)
- St. Patricks (1)
- starlite & soul (4)
- Steampunk (26)
- Summer (110)
- summerween (1)
- Sweet (3)
- SWLOM (1)
- Tag (44)
- Taggers Delight (7)
- tagging (1)
- Tasha's Playground (88)
- Tech (4)
- Template (11)
- Thanksgiving (12)
- Thoughts (103)
- Timeline (210)
- Timelines (70)
- Tiny Turtle (4)
- TKDezigns (38)
- Tony T (3)
- Tonya (3)
- Toon (1)
- TPP (8)
- Travel (1)
- Treasured Scraps (7)
- Tresured Scraps (26)
- Tutorial (220)
- UYA (6)
- Valentine's Day (100)
- Verymany (64)
- Vi NIna (1)
- Vintage (112)
- Wallpaper (467)
- WDDesignz (38)
- Western (2)
- Whisprd Desginz (10)
- Wicked Diabla (18)
- Wicked Princess (171)
- Winter (138)
- WITW (1)
- Women (188)
- Wordart (12)
- Words (57)
- Zaric (3)
- Zindy (66)
- Zodiac (2)
- Zombies (11)
Followers
Blog Archive
-
▼
2012
(158)
-
▼
June
(21)
- Dream A Little Dream
- Tiny Blessings
- Haunting You
- Ice Cream Cutie
- Sounds Of Freedom
- Be Yourself
- Angel Whispers
- Lorenzo Sperlonga Forever Angel Tag
- Cupcake Fairy FTU Scrap
- Renee Lavoie Tag
- Beach Days
- Never Too Late
- Original
- Keeper Of The Secrets
- Beauty With A Gothic Heart
- Pastel Mermaid
- Lady Cupcake
- Clear Reality
- Flowers In Her Hair
- 1 Scrap Two Tags
- Lemonade Girl
-
▼
June
(21)


0 comments:
Post a Comment